MOTB: Necron obelisks

Finished product first!

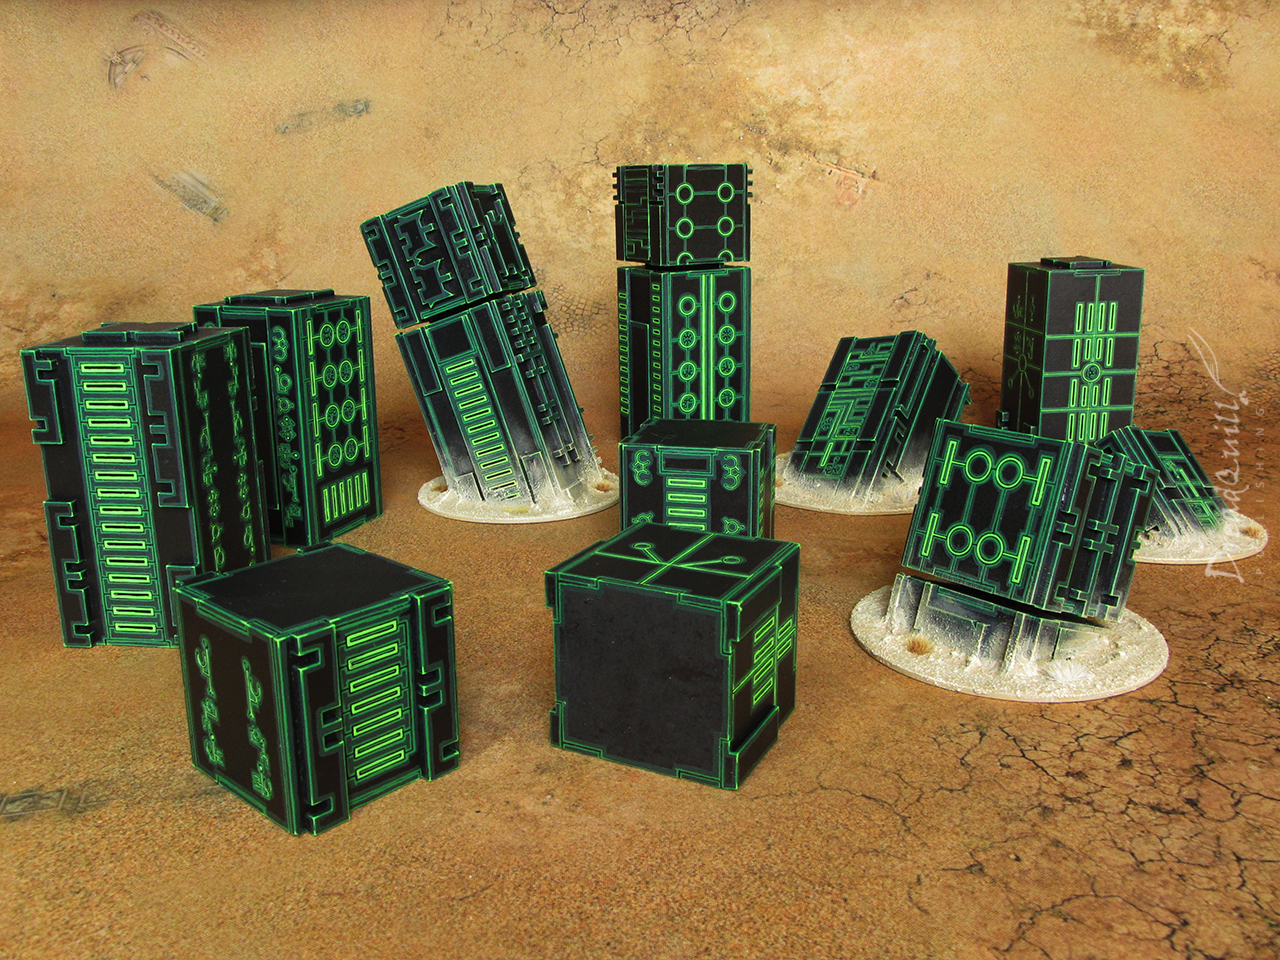
As part of a recent scenery purchase from a local terrain company, I also snagged some obelisks from Wargame Model Mods’ weird and wonderful Necrotech range. I’d been meaning to do some proper weird alien terrain as a palette cleanser from all the underhive grime I’d been building, and these looked just the ticket.

Getting more for your money

I wanted enough to reasonably scatter across a 6×4 board, and one pack of Obelisk blocks would give me plenty to litter the tabletop with. They arrived in a series of neat little bundles, already punched out.

They fit together very pleasingly, and I was surprised at how big they were. I didn’t get much of a sense of scale from the original images, and even the smaller blocks were quite imposing against a 28mm guardsman.

I hadn’t read the description properly and didn’t realise that half the panels had no detail on them – presumably so you could stick them together into a mega-block like the one advertised.

I wasn’t going to do that with this set (although I may do one in future), I wanted as many individual blocks as possible to have as much variation on the tabletop, including some half-buried in the ground.

I’d need to come up with some clever trick to detail the plain panels I had.

The kit came with an assortment of smaller flat spacers for gluing the obelisks together into a mega-lith, but for me they would be extra panels to fill out the flat surfaces.

By taking two detailed panels and cutting them up, I could arrange those cut out pieces across four plain panels. With some help from some spacers, I now have four detailed panels!

As an absolute mad lad I also own an MDF bits box, filled with the weird inserts and offcuts from MDF sprues that I use for detailing and greebling. They came in perfectly handy for this task.

I picked out a collection of necron-looking bits that would give me some nice clean edges to show up the colour scheme I was planning.

All the main blocks were assembled first to get an idea of how much flat space I needed to cover. And then a terrible thought struck me. What if I could make one block… into two?

Several intense hacking minutes later and I’d made four bits of scatter out of two obelisks. I wanted them to look sunk in the sand, either abandoned or just being unearthed.

I stuck them to some round bases and smeared a load of pre-mixed filler around the join to look like a buildup of sand.

Some of them got extra smaller blocks added on top to imitate the obelisks at different stages of decay. It was also at this point that it really hit home how big all of these were going to be, and how tricky they would be to paint…

And that was all of them assembled! A thoroughly enjoyable kit to build and very modular, especially if you’re a hobby sadist like myself who likes to squeeze more content out of their kits.

The only thing I’d like to see moving foward is the option to purchase either/or when it comes to the non-detailed plates. Perhaps an option to upgrade/replace to fully detailed plates so you can build 16 obelisks out of the box, as currently you can only “technically” build 8 fully detailed obelisks, with the other 8 being blank.

Great if you want to build a chunky obelisk with only a handful of outward facing sides, but a fully detailed plate option would be ideal!

Absolute tool

Every artist has their “aha” moment when it comes to new tools. Mine came during this project. Specifically, “Aha, I should have bought an airbrush (and pracised with it) a year ago, because holy dicks this would have been a breeze”.

Instead, I gave myself RSI and several grumpy weeks of not being able to paint anything. Note to future self – when your wrist starts to hurt – STOP PAINTING.

Lines upon lines upon lines

I am so glad I persisted however – the overall effect is exactly what I’d hoped. I must have spent at least an evening on each block, repeating the same recipe over and over. Extremely satisfying to paint, so much so that I found it easy to get carried away into the wee hours and cramp my wrist…

  1. Generous undercoat in matt black, two or three coats in some places. MDF is thirsty for paint, so I did a few passes (letting it dry in between) to make sure it was fully saturated.
  2. Thicc line of Caliban Green
  3. Thin line of Warpstone Glow
  4. Tickle the corners and fill the shapes with Scorpion Green.

The last paint is OOP, but moot green didn’t cut it. I wanted an acidic, almost fluro yellow/green for the final stage to give it a proper glow.

The bases were textured paint, then undercoated with Zandri Dust and drybrushed with Bleached Bone, topped with cheeky grass tufts.

The colours for the base were decided before I bought the battlemat, and given they’ll most likely be deployed against this background, I’m tempted to go back over the bases and darken them down a bit to match. A project for another time, I think!

Megalith

I mentioned previously about making a huge obelisk rather than multiple smaller ones, and it’s something I’m genuinely considering for the future. For now, my existing kits can be bundled together fairly convincingly to create weird looking structures.

And, naturally, it works great at 54mm scale. Perfect for Inquisitor!

Standing Stone-Vation

Not much else to say on the painting – simple scheme, tedious to apply, but looks ace when it’s done. I bet it would have been so flippin’ easy to do with an airbrush too. Oh well, I know for next time!

On with the scale shots.

Wrapping up

What a wonderful little kit this is! Aside from some self-inflicted enthusiasm injuries, these have been a joy to build and paint. They’re ideal for all the games I play – Necromunda, Inquisitor, a few TTRPGs like Dark Heresy, Rogue Trader or Wrath and Glory, and they’re super convenient to store.

I’ve already got my eye set on some more obelisks for future projects, and I’ve got a large necron building from the same range that needs photographing, so watch this space!

I picked all these up from Wargaming Model Mods for under £20, so go toss come coins to a small independent business.

Let’s hear it for the humble obelisk!

MOTB: Twiglet tube silos

Finished product first!

Last week I put the finishing touches on a gang hideout in an abandoned chemical facility and I happened to have some snack tubes leftover from various Christmas indulgences. They can’t be recycled, but they can be reused, and with a few extra bits here and there, would look very nice in my weird chemical facility family.

The prototype

I made this one long before Christmas to use up some bits from the box and loved the design so much, I put off finishing it until after the inevitable holiday crispageddon furnished me with excess foiled tubes.

Simply put, it was just about finding interesting-looking parts that worked well with together. I talked about the design flow of scenery in last week’s Chem Silo article, and although putting it up on stilts looked cool and gave it the underhive water tower aesthetic I was going for, functionally it was a bit weak. The legs don’t provide much cover, the bulk of the tower doesn’t block much line of sight, and the whole thing was a bit wobbly.

Luckily for me, my partner had just finished up their subscription to Conquest magazine and had a bunch of random battlefield scatter they weren’t using soooooo……

I experimented with a single ladder to the ground and didn’t like it. Adding a platform with a railing meant models could be placed halfway up if they don’t get all their movement, and provides a modicum of cover at the expense of field of view.

Totally tubular

I was in love with the design, and ate many more baked snacks over the next few weeks. I had to draw the line at the number of silos I was going to make however – I already had boxes of scenery piling up in my bedroom, so I had to start being choosy about the volume of scenery I was making.

Three more silos built – this time of varying heights and playability. I wanted them to look of similar design but with slightly different purpose so should the need arise to have a scenario about poisoning water tanks or destroying fuel supplies, they all present different challenges.

Big shout out to this Gothic Upgrade Pack from MAD Gaming – you get a huge number of interesting buttresses, uprights and other greebling for your money. I had some for a specific hab project, but kept buying more becuase they’re so useful for sticking onto literally anything to make it look 40k.

Other features were made from bits of plasticard or random scraps from the bits box. I’m not the proud owner of an MDF bits box too after a particularly long and wood-filled pandemic spent hobbying, so there was a lot of spare bits to arrange in interesting ways.

Once everything was dry, it was time for a hearty dollop of my homemade textured paint – a mix of ready-mixed filler, modelling sand, PVA glue and a splash of poster paint for colour.

Once dried again, everything got undercoated in black, zenithal highlighted with a grey rattlecan, and key areas picked out with a rusty red colour from my local hobby shop.

A series of tubes

Painting was straightforward, and used the same recipe as the Chem Silo, the main difference being a lot more flat surface to paint. On one hand, it meant I got to experiment with masking tape and sponging on the red decal, but it also meant a lot of manual brushwork.

I’m sure there’s a technical name for the technique I use for walls and panels in this style, but it’s basically very heavy drybrushing. I get a natty old brush, wipe a lot of paint off it, and roll it round on the surface to create uneven, patchy layers. Over a dark-ish undercoat, it creates a nice weathered effect, looking like actual paint that has worn off over time.

I think this worked best on the tall silo, I went too heavy on the pair of medium silos and lost a lot of the texture around the corners of the panels. I tried to make up for it during the weathering stage, but it wasn’t the same effect. Shame really!

Glamour shots

On with some closeups, with our classic bickering couple to give a sense of scale and how the silos might be used in game.

Overall I’m happy with how they turned out. I’m a little disappointed that one of them came out much better than the others, something I only really noticed when I put them all together and started taking photos of them. I liked the effect up close, but it was only when arranging them on the tabletop I realised what I should have done.

Oh well, live and learn!

The family photo

MOTB: Chem silo scenery

Finished product first!

I recently discovered a local scenery company called Wargame Model Mods and put an order in over lockdown. They did some of the better mdf xenos scenery on the market, and picked up one of their (very reasonably priced) Chemical Silo to see what it was like. I had a few tubular buildings of my own built from Christmas snacks, and thought this would round out the collection very nicely.

pakidge

I barely had time to clear some space on my bench before it arrived. My house was soon awash with the blissful smell of lasercut wood once more.

Such neat little packages! Most of the components came pre-punched, bundled and baggied for ease of identification – something I’d not encountered before in my many years of scenery building. I’d ordered three kits – two of them filthy xenos technology – so I set the extra pieces aside while I worked on the silo.

Quality and quantity

I was impressed by the quality of the kit (especially for the price!), and the material was thinner and denser than other mdf kits from other suppliers. It made the whole kit much lighter than I expected, and the smaller pieces were much less liable to explode into dust.

The only real criticism I’d make is the instructions were a little sparse. It asked for certain named parts from the sprues (like walkway railings) but didn’t suggest which ones they might be.

There are three simililarly-shaped walkway sections – two of which I put the wrong way round. It was straightforward to fix as the glue hadn’t dried yet, but some clearer images on the instructions or website would be a very easy fix to this problem.

Internal workings

Removable roof you say? I’m a sucker for a good building you can put little toy soldiers in, so of course I’m going to assemble it with the optional removable roof. I laid down some textured plasticard to act as a floor.

All those little holes are for LEDs – you can spend a few extra gold coins on the webstore and get a fully-working lighting kit thrown in too. Nearly all their kits are designed specifically for moving parts or fancy wired lighting – how cool is that!

In my excitement, I fear I lost a vital piece of the puzzle. I must have misplaced a piece to use as the actual floor, so the plasticard just sat over a void in the base board. This isn’t particularly durable and sounds like a drum when you put a mini on it, so I reinforced it with bits of offcut sprue from the kit.

I had also taken it upon myself at this point to overcomplicate the task at hand. I had been sizing up different bits of plastic scenery to help blend this kit in with my collection, and although the kit came with its own mdf door, I had a neat GW pressure door from the (sadly discontinued) Rogue Trader Killteam set that looked perfect.

Unfortunately it meant hacking a huge hole in the side of the building and carving massive gouges from the door frame to fit.

When building scenery, I like to design with playability in mind first. Why would players want to send their gangers into/on top of these overly-intricate creations? Usually for buildings, it’s because they have windows or ports to shoot from, giving them decent protection from any return fire.

There aren’t any windows on this little hut and I didn’t feel like agonisingly cutting into the dense fibreboard any more, so a new plan was concocted.

I kept it open enough so objectives could be placed inside – it’s a secure enough location, and gangers might want to stash things inside. A couple of tubes and consoles gives a loose implication of the shack’s original purpose – perhaps some kind of monitoring station for whatever is in the silo? Whatever it is probably isnt working any more, and the silo has been repurposed by entrepreneurial individuals.

A few bits of plasticard stuck around help break up the flat wall panels and I installed a ladder to the roof.

After a lot of deliberation, I decided the main draw for the terrain would be a hideout installed on the roof. I’ve been obsessed with people’s conversions of turning GW containers into living spaces and wanted to do one myself. I found the container was the perfect height to match with the top walkway on the silos, and an idea formed.

Penthouse suite

I added some gothic buttresses from my personal collection to help blend it with some of my other buildings and fill out the dead space on the baseboard.

I’m generally not a fan of scenery on bases unless the base can help tell the story, so I planned to fill it with spare barrels and pipes to provide more cover and allude to what the site was once used for.

I built a little shack on the roof, furnished it with odds and ends from the bits box to make it look more lived in. I’ve mentioned playability of scenery before, and the key principle of that to me is flow – gameplay should be able to flow across the scenery.

Going with the flow

Height and cover are the mechanical benefits for using scenery in games like Necromunda, so you want to encourage players to seek out those benefits by making them enticing and interesting.

By building a walkway from the top of the container to the silos and adding a ladder to the roof, fighters can now traverse the entire structure without touching the ground. It would have been easier for me to stick a ladder on the outside of the building and call it a day, but that would relegate the building to a boring wooden box that serves only as a spacer for the diorama on top.

By building the ladder inside and adding a hatch on the roof, the fighters naturally have to enter the building to access the roof. This creates natural chokepoints and opportunities to use in-game mechanics – a rickety walkway, an open hatch, a lockable door. A ganger has sealed the hatch and is using the vantage point to pick off members of the rival gang – will they risk trying to unseal the hatch, or take the safer (but longer) route round the back to take her out?

Rather than just being a simple line-of-sight blocker, the flow of the scenery now creates interesting situations that sparks exciting narrative and (hopefully!) thrilling gameplay.

Finishing touches

Of course, no scenery piece is complete without lots of little details to make it feel lived in -some chimneys, an oil drum bbq, a sack, some candles on a crate, a mattress in the container. Some pieces are there to form cover, while others are just there for worldbuilding.

A piece of tissue paper soaked in watered-down layers of PVA formed the tarp over the propped-open container door, a neat little visual short-hand for “someone probably lives here”.

Small squares of plasticard were stuck haphazardly about to simlulate repairs or access panels and helps break up large flat areas when painting.

Once it was dry, everything got a liberal dousing with my Secret Scenery Sauce. This is just an extremely low budget textured paint, consisting of PVA glue, ready-made all-purpose filler, a small dollop of black paint, and mixed modelling sand. I tend to shake off my cutting mat into my modelling sand after building things to help vary the size and texture of the particles too. Waste not!

Painting the silo

The entire piece was undercoated in matt black, with a zenithal grey spray highlight. Key areas were picked out in a rusty red colour (also rattlecan), such as roofs and walkways. I was working on some other silo projects alongside this, so I sprayed them all up at once.

It never ceases to amaze me how much a piece comes together ocne you’ve undercoated it. Painting it was straightforward, as I already had a recipe from the Mercy scenery I finished last year (but have not got round to photographing because I’m a monster).

Final photos
  1. Drybrush all raised edges with Dawnstone/light grey.

2. Tear off a little bit of sponge (rougher edges work better, I find) and sponge on some light brown around the edges of metal sections to emulate paint chipping. Concentrate it around areas most likely to be touched or roughed up. I use a pair of tweezers and a little cube of sponge about a half-inch thick, but I’ll use a bigger bit for larger scenery pieces. Repeat with a darker brown around concentrated areas to look like deeper chipping.

3. Paint blocks of colour – orange and silver for barrels, bone colour for the tarp, grey-green for the container, pale green for the wall panels, some yellow/black hazard stripes around key areas.

4. Liberal application of Agrax Earthshade, usually splashed into recesses and corners to create depth/dirt, but some bits get completely covered (like metals, boxes or tarps). The barrels got a wash with Nuln Oil, and the tarp got a second wash with Athonian Camoshade.

5. Once that’s dry, I get a mix of very watered down orange and apply rusty streaks where water from above would naturally pool. I used to do multiple extremely thin layers of orange, but who has the time for that?

6. Decals! I have a collection of little posters I’ve acquired from across the internet (usually by googling 40k posters) and made a few myself related to our own games, which will get a blog post of their own at some point no doubt.

I download them and print them out on regular paper. Once they’re cut out, I tear off a corner or two, scrunch them up real good, then paint some PVA onto the reverse and attach them roughly to the intended surface. The trick is not to make it look too neat – they look best when they’re folded over on themselves, slightly peeling away from the wall, and overlapping each other.

7. The final touch is some good ol’ Typhus Corrosion. This is usually applied with a big stiff paintbrush, and either flicked or stippled on to surfaces that are still too flat or boring. Typically posters get a little attention to help blend them in with their background.

And that’s it! It can take a few evenings of labour to get them finished, but having the recipe in place makes it easy to paint large batches of scenery without too much thought. I’ll be inevitably acquiring an airbrush in the near future to help me deal with some other bits of scenery, so it’ll be interesting to see how much this recipe changes once I’ve got the hang of my new toy.

Glamour shots

You’ve read enough words by now, time to roll out the pictures. Enjoy!

Two thumbs up

Overall, the Chemical Silo kit was a delight to work with. It comes with enough detail that you cansplash a few colours across it and use as-is, or you can fill in some of the gaps with other bits of scenery from your bits box to blend it in with your collection. There are loads of other kits with similar designs so you could easily fill a board with various factory pieces, silos, conveyor belts, etc.

If you haven’t checked them out yet, go buy some stuff from Wargame Model Mods. They’re a small company with a huge range of stuff (battery-powered mechanised scenery anyone?) and could absolutely use your Imperial Credits over some of the larger companies.

I had a blast working on this, and it sparked enough creativity that I wanted to see the project through as quickly as possible. I’m really looking forward to playing with it now!

MOTB: Prototype Arco-Flagellant X206

Finished product first!

The next addition to my latest Inquisitor warband – a band of questionable Magos Biologis and their experiments – including Genetor Vacillus and their stompy Beetle-back retriever.

This is prototype Arco-Flagellant X206 – the product of some late-night radical brainstorming something along these lines:

LOTR second breakfast meme, Pippin is a radical magos, Aragorn is the Mechanicus. What about electric whip limbs? We already have it. We've had one, yes. What about a second set of electric whip limbs?
Designing X206

I knew I wanted a melee monster for the warband. The Zeta-phi “Beetle-back” forms an immovable front line and Magos Vacillus provides ranged support, so I needed something to round out their battlefield roles.

I had lots of Arco-Flagellant bits floating around (hah!) as I never made one for myself. I always found them grossly overpowered for average play, but I loved their horrifying aesthetic.

I ended up with lots of Talos bits left over from building the Zeta-phi servitor, including an uncomfortable amount of neat-looking tentacles. The arms were a perfect fit for the arco-flagellant body, but I wasn’t happy with the running legs. Unless…

The hovering base of the Talos was a perfect fit, and filled with the remaining tentacles and weird fluid vials gave it the perfect Mechanicus side-project aesthetic. It even encouraged me to model it in-flight, as though it was sweeping through the halls like an angry electric squid. Very big Matrix Sentinel vibes.

Very long pins were put through the two tentacles touching the base (with a LOT of superglue) and the resulting pose is surprisingly stable. A little mechanicus backpack covered all the injector holes that come with the torso, and he’s ready for the rattlecan.

A prototype paint scheme

Although I wasn’t particularly enthusiastic about painting all that naked flesh (I tossed around the ideas of electoos but seriously, ain’t nobody got time for that), the base colour schemes were already decided by the previous two lads.

The big stinker was figuring out how I was going to do the tentacles without destroying my will to live. I must have done about five or six repaints before settling on the ‘inner glow’ look here.

A few choice pipes were picked out for the yellow/dark grey stripy treatment, as I enjoy hazard stripes as a spot colour (and fits with the Mechanicus aesthetic quite nicely). In the grim darkness of the far future, there are still sacred health and safety tenets that must be unquestioningly followed.

One colour scheme involved lots of electric blue. Although it was different, it was a pig to paint, and really went against the colour scheme. I stuck with the ‘mystery green fluid’ aesthetic that seems to power all the weapons in the warband – the unnatural fit ties everything together visually, as well as reinforces the themes of being powered by something inhuman.

I’ve toyed with some ideas for how he’ll be on the battlefield, but the bottom line is moving fast and hitting hard. His main unique selling point is swimming through the air on electro-aetheric propulsion, so obstacles and pitfalls aren’t really a concern. Unless of course, someone has a haywire grenade…

To balance out his massive mobility, he’ll be significantly toned down from a ‘true’ arco-flagellant. Of course he’ll still be an electric murder machine, but he won’t have all the combat drugs that can be activated to turn him into horrifying 200-something strength monstrosity that melts space marines.

(Also because I don’t like calculating all the new stats on the turn you want them to kill something ayyy lmao)

As for defence, I’m on de fence (hah!). I’ve got two visions for him, and I don’t know which would be more fun to play with/against. The first involves him moving silently – a tentacled horror stalking darkened hallways, barely giving off its presence save for a few dancing lights like a deep sea predator.

The other involves manipulating the unnatural energies into a crackling force field – he’ll be far more resilient but stealth won’t be an option. Instead he’ll be more like a frightening living antibody – an electric nightmare that beelines for its target and doesn’t stop until they are subdued or disintegrated.

The wrap-up

Given how this electric lad sat on my bench for 3-4 years before I got round to finishing him, I’m extremely happy how he turned out. You can see from the WIP photo that he was basically all finished, I just ran out of ideas on how to fill all the little injection holes, whether I’d give him back tentacles, make them from guitar string, whatever. He just needed a little backpack, and that was all the motivation I needed to start slinging some paint on him.

I’m very excited to get him on the tabletop (one day!) as I feel like he rounds the team off nicely. Now all I need to do is finish off the big guy himself…