
A scenario in an old Inquisitor campaign, Crown of Bones, called for the infiltration of a secret genetics lab deep beneath a Navis Nobilite estate. I planned to use my Necromunda walls and tiles to create the winding catacombs, but I didn’t have anything I could use as set dressing. Just what is in a horrible genetics lab?
I hit the internet and scrolled through the usual scenery vendor fares, but nobody offered anything like what I was looking for. You might find the odd cryo chamber or tesla coil on some independent retailers but I needed enough props to fill a table, not just one or two small pieces barely enough for cover. It was time to hit the bits box.
I was working in the lab late one night
The most consistent problem I butted up against was what to actually build. We’ve all got a pretty strong mental picture of a mad science lab, but trying to pick out individual components to enlarge and duplicate was surprisingly tough. I had a limited amount of time before the game I’d need them for, so I couldn’t do anything overly complicated either.
I needed floor-fillers that were visual shorthand for ‘bad things happen here’, and that could be reasonably re-used in other games or settings without any effort. I wanted to do the classics like rows of bubbling beakers, tesla coils, or cogitator stacks, but nowhere sold anything large or detailed enough to use as a conversion base I didn’t have the time, money, or inclination to scratch build my own. I boiled it down to three key features:
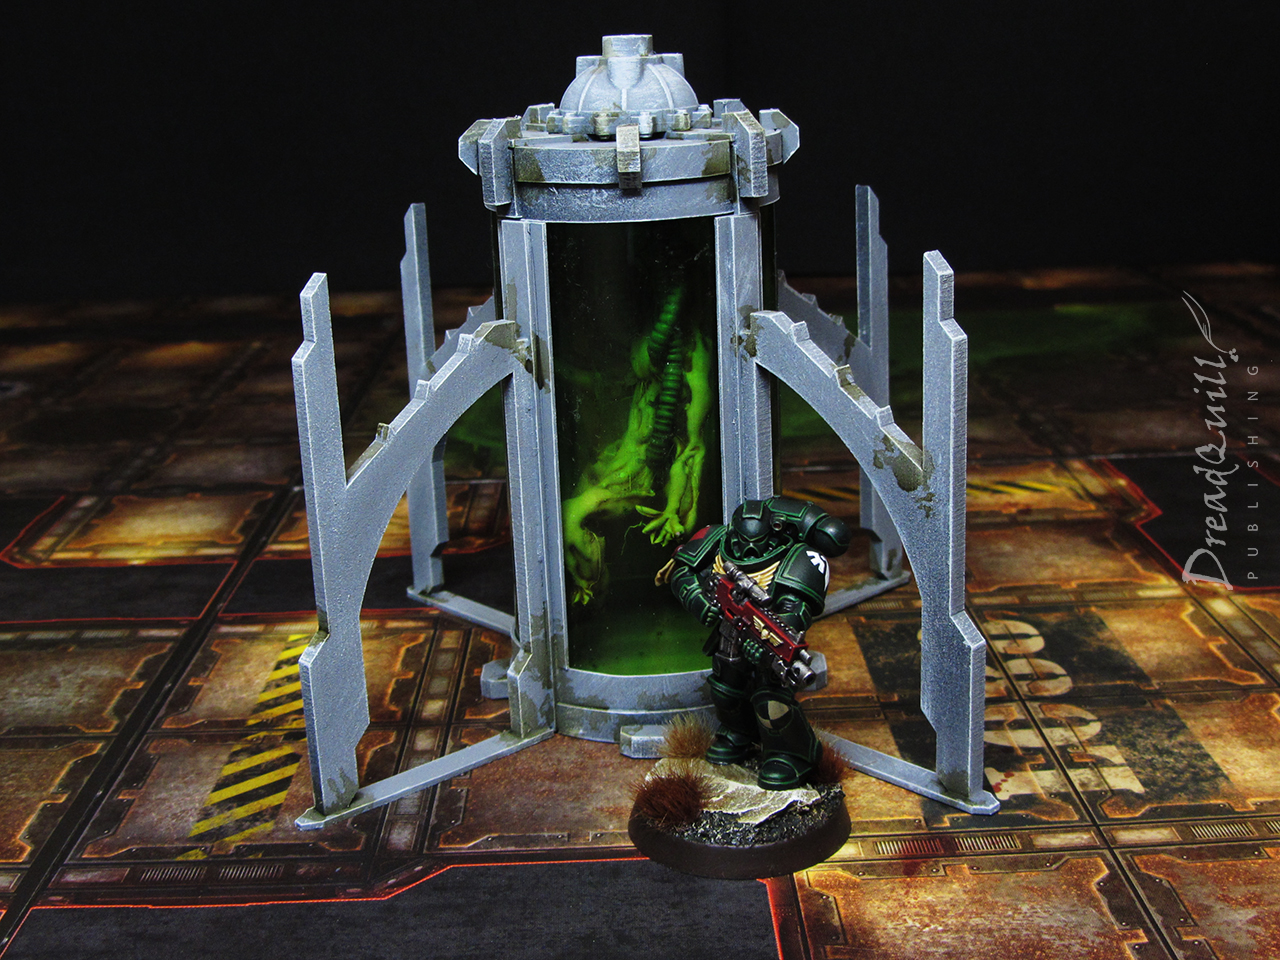
- Cloning vats – it was a genetics lab filled with failed clones, so this was a must.
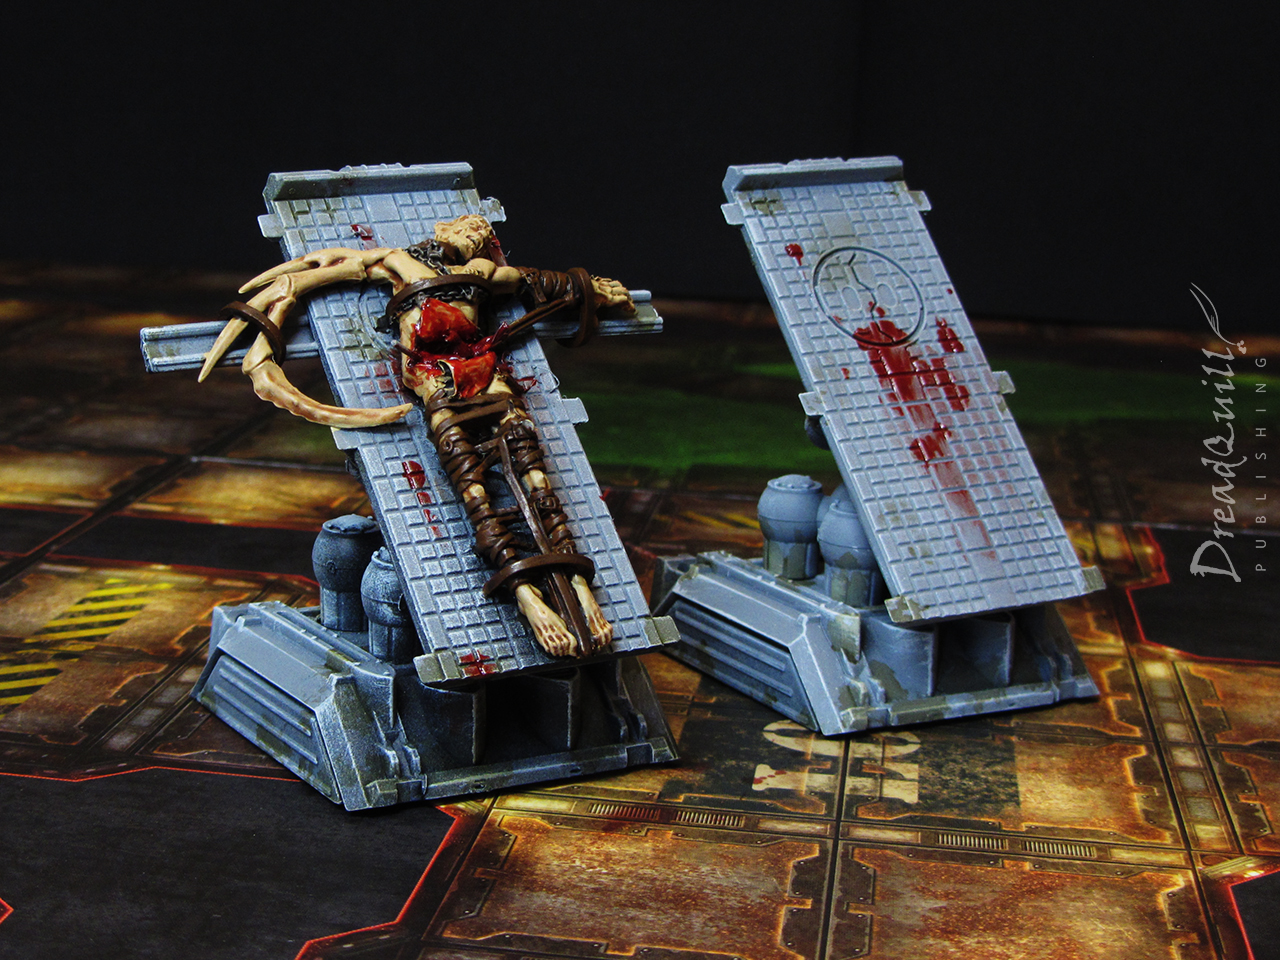
- Surgery/autopsy tables – a sci fi horror staple, and can easily be repurposed into a dozen other Inquisitor scenarios.
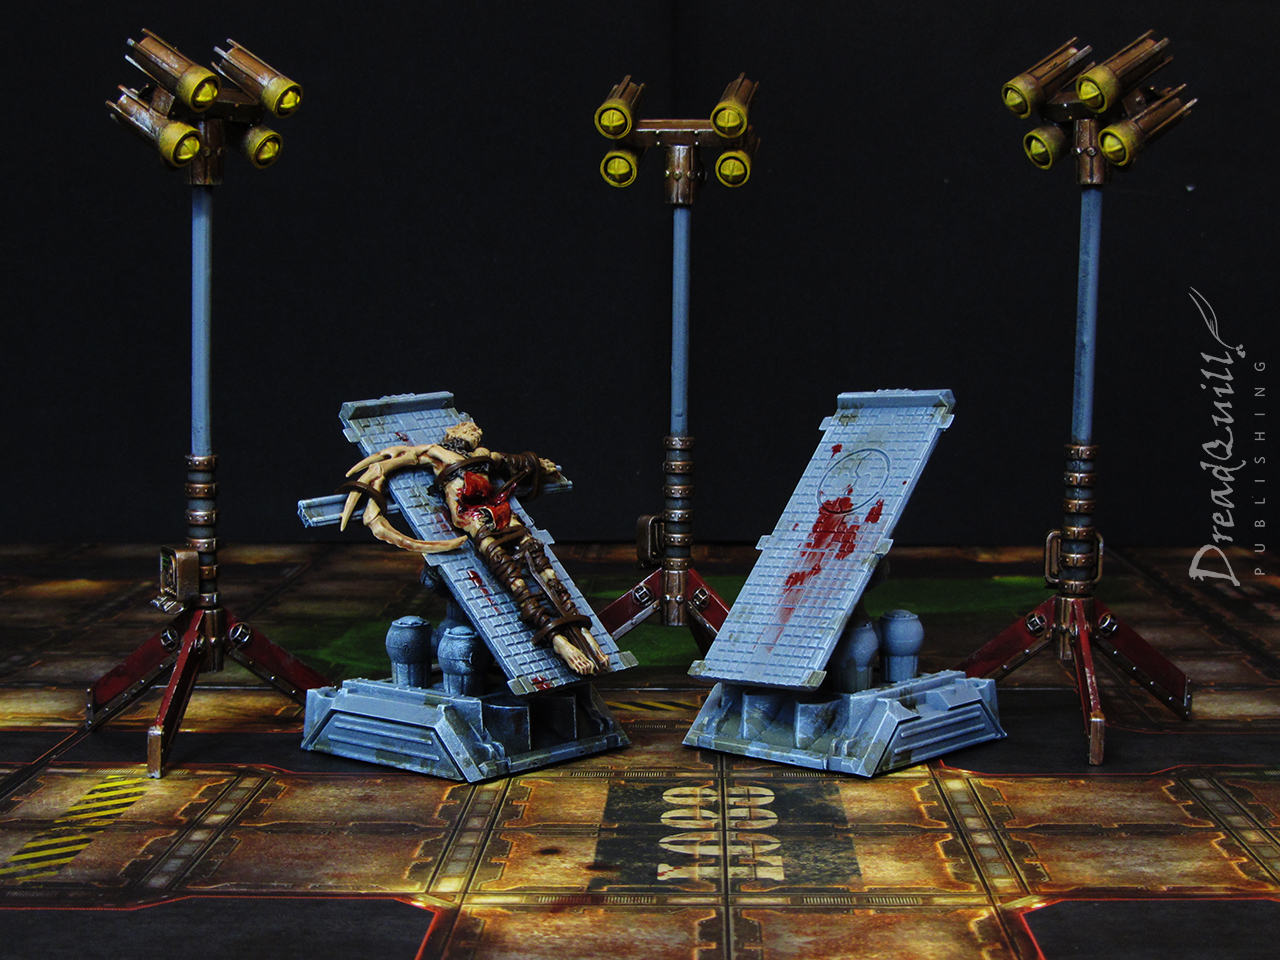
- Floodlights – I originally planned for multi-limbed auto-surgeons with lamps on them, but settled on floodlights for their versatility. They could be used in any number of outdoor situations, and provide an extra dynamic to the board. Not only can you play with lighting condition modifiers, but you can strategically place them around your plot maguffin to signpost to your players what they should be looking at. A literal metaphorical spotlight!
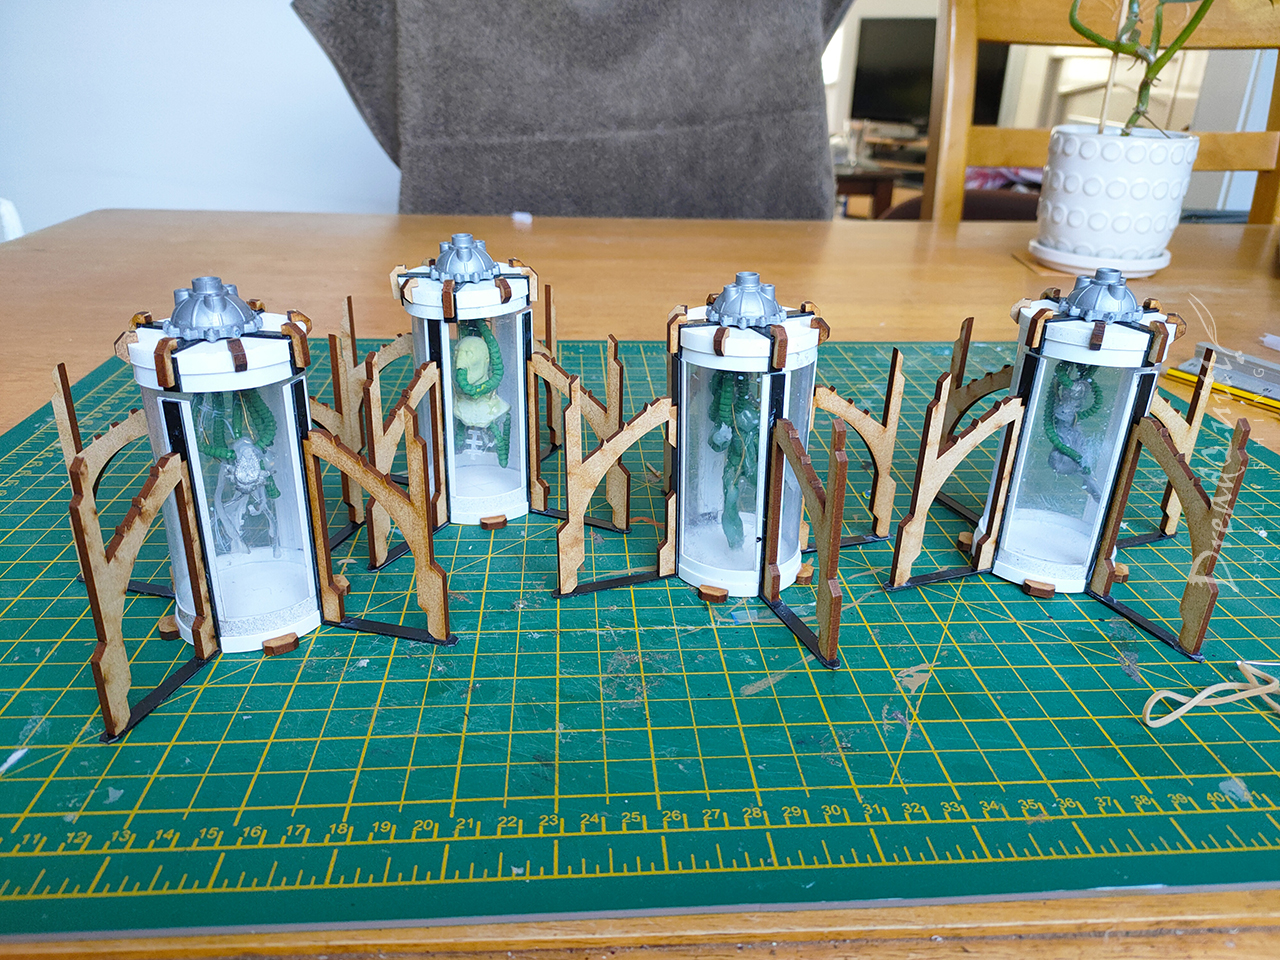
Cloning vats
These were the bits I needed to get right, so they took most of my energy. I already had a rough idea of how I wanted it to look – I had a lot of MDF gothic buttresses lying around from my hab block project that would be perfect around a central pillar, but what to use for the vat itself?
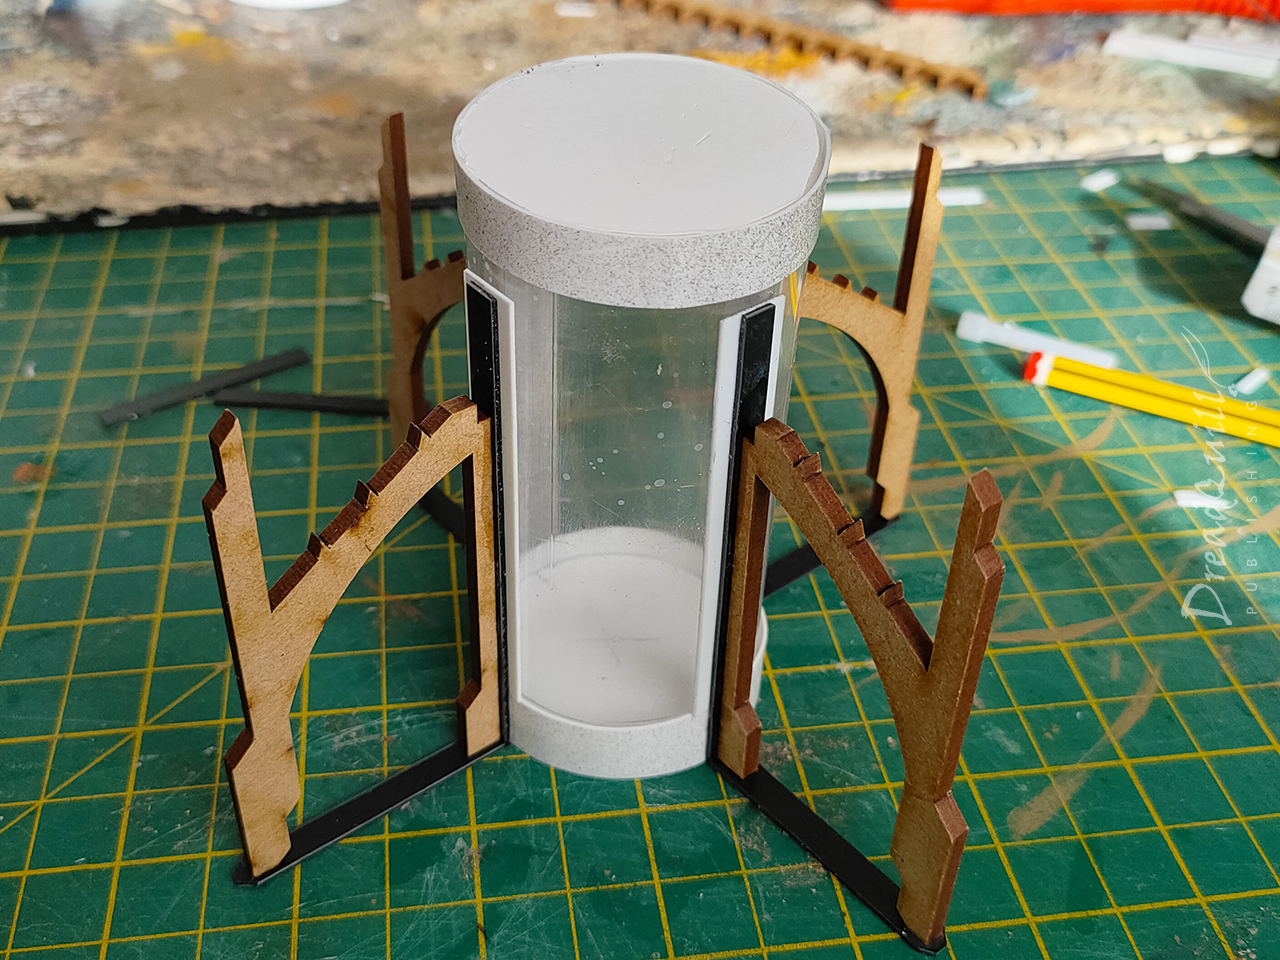
I played with the idea of doing the vat in clear resin and illuminating it with an LED, but that involved more experimentation time than I had available to me. I eventually found some clear plastic tube packaging that came with some washi tape, so snatched up a couple packs of that and set to work carving them into more appropriate sizes.
The casing was made from strips of plasticard cut to length, with circles of foamboard at the top and bottom for structural integrity. I detailed it with little plastic and mdf gubbins to give it more interesting shapes when it came to painting.
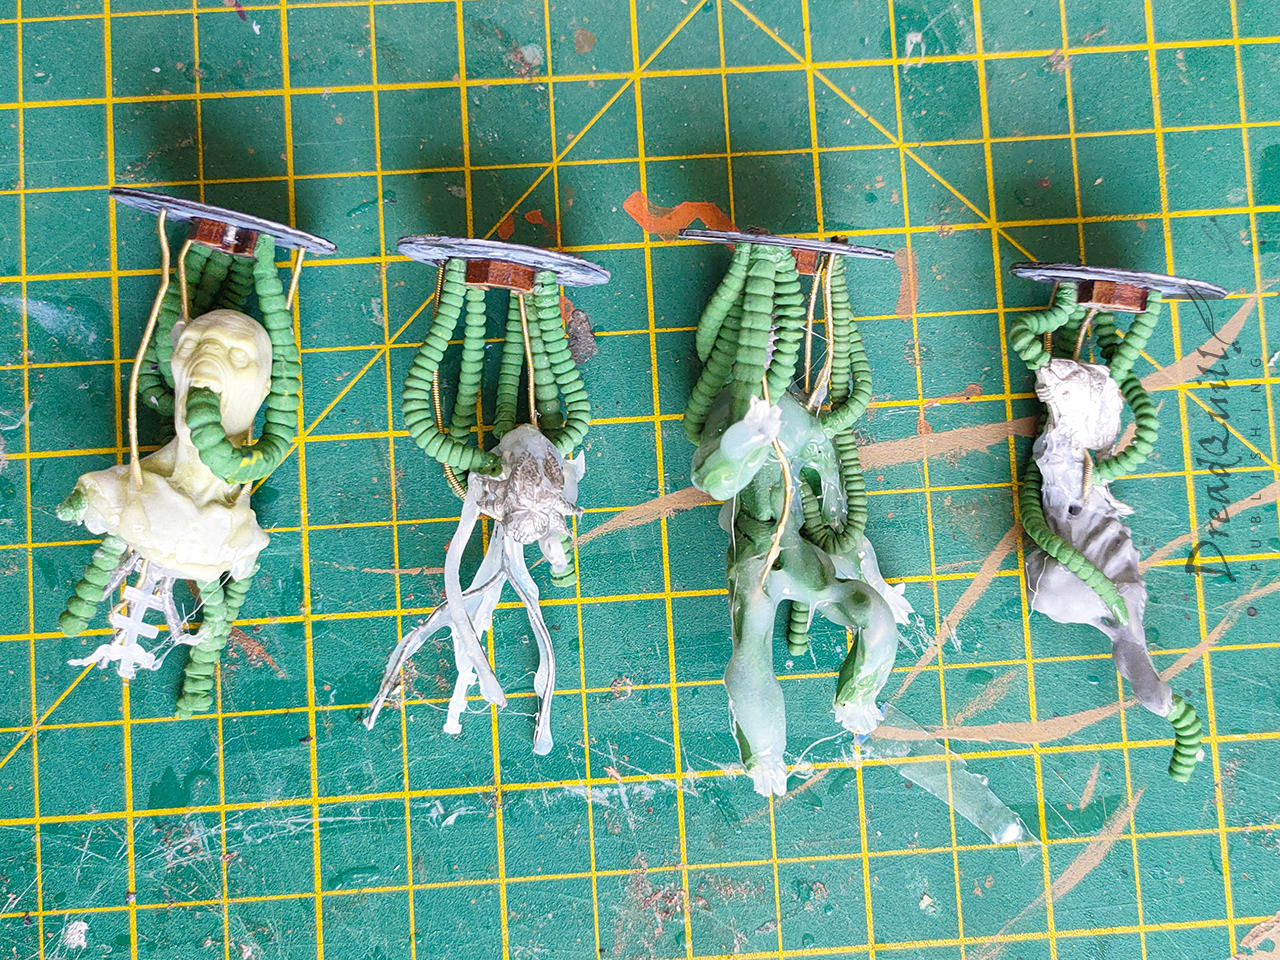
I wanted the interiors to be removable so I had a choice of inhabitant for future usage. I made up a few horrible little guys out of random odds and ends from the bits box, some wire, green stuff tentacles, and hot glue (inspired by the suitably horrible Widower project). They didn’t need to be anything specific, just representative of something organic and questionably alive floating around inside a vat of mystery liquid
They were attached to magnetised ceilings so they dangled inside the vats and could be removed or changed by taking the lids off.

I didn’t glue the transparent tube into the base as I wanted some way of representing a broken vat when someone inevitably goes Hans Gruber on the glassware. I toyed with the idea of creating a broken insert but it was very complicated and I didn’t have enough plastic tubing to do it justice. Finished, not perfect!
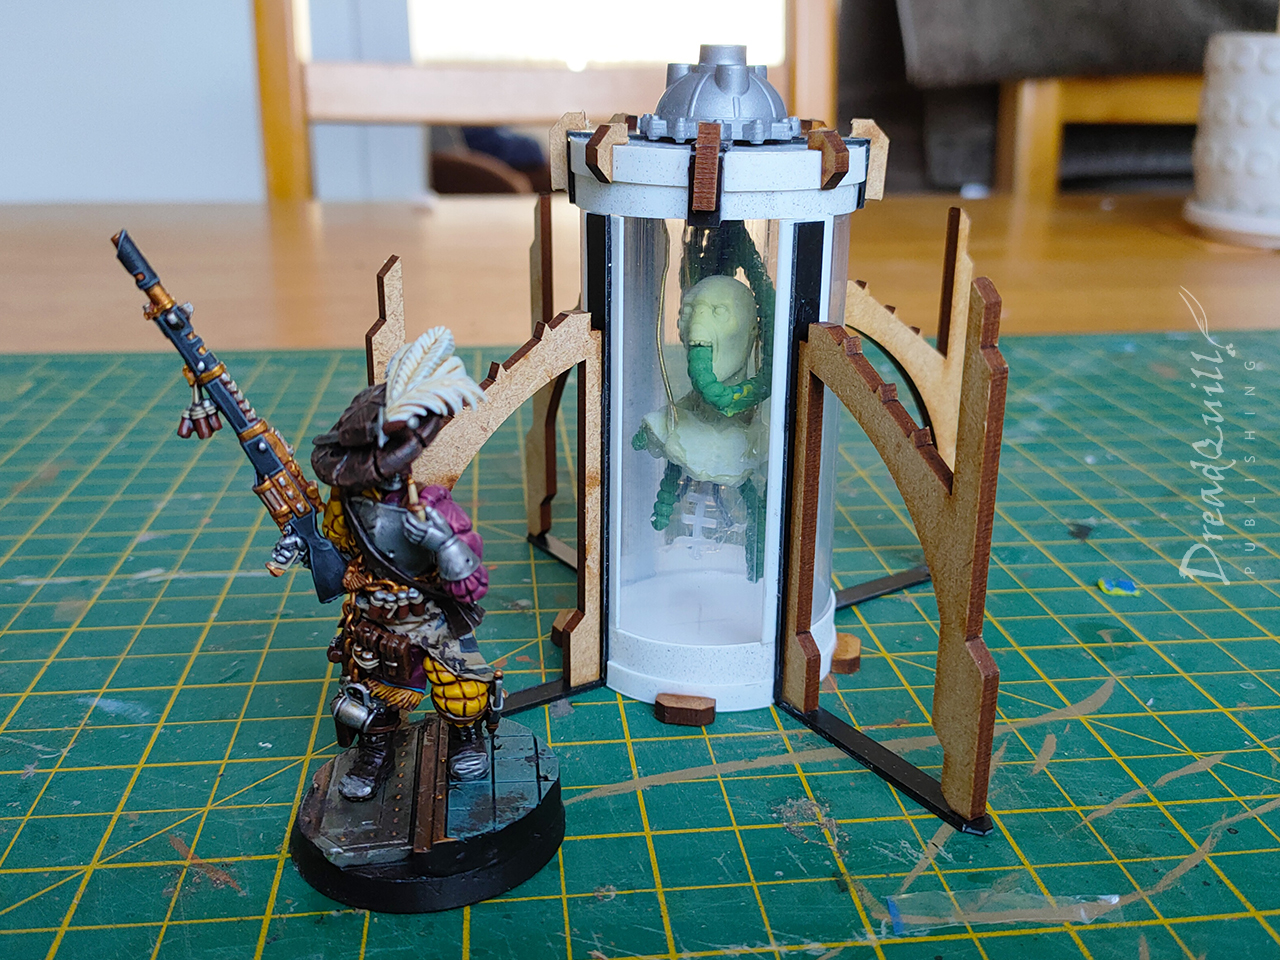
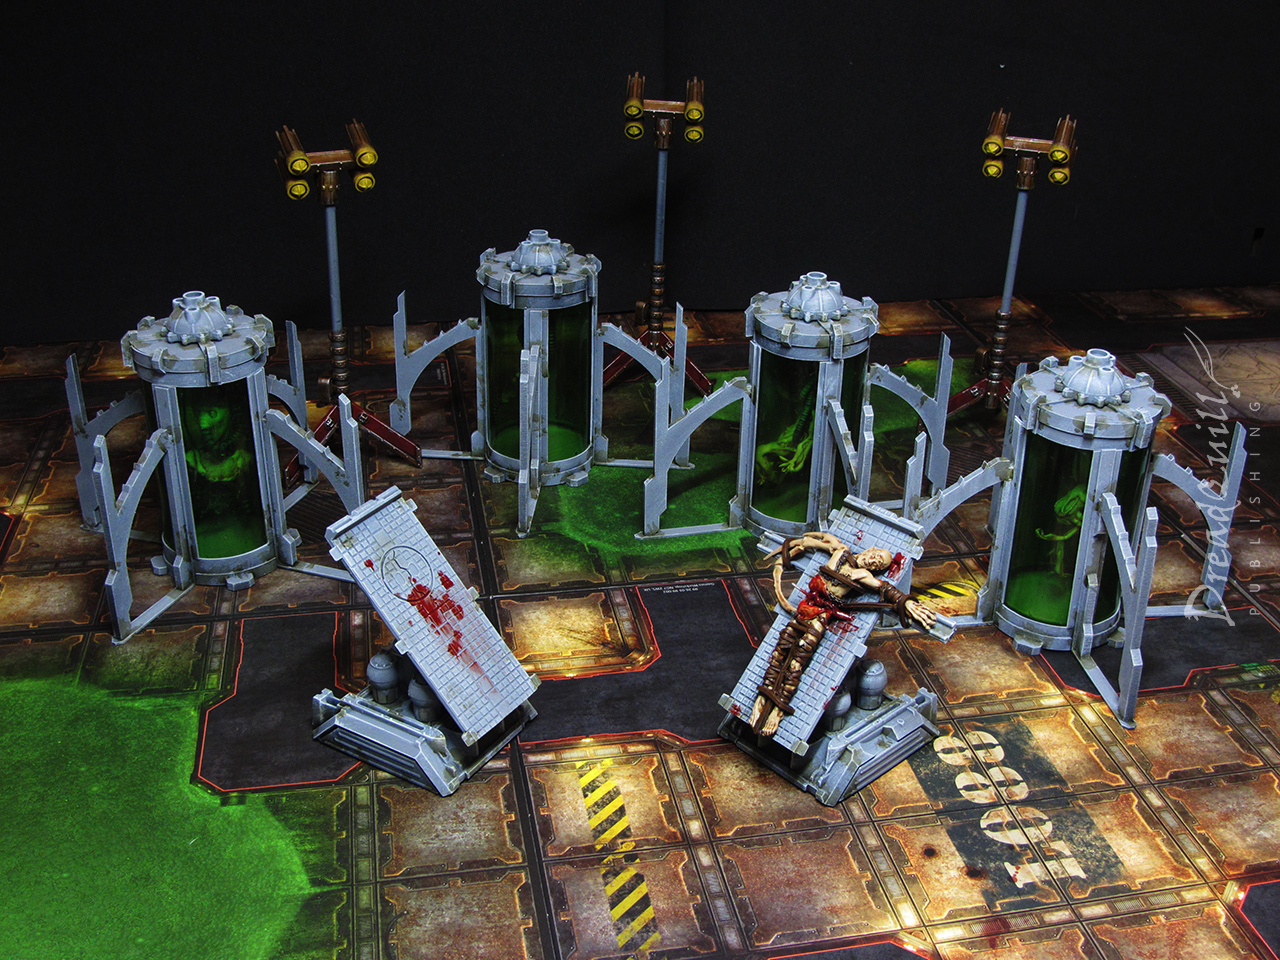
The finished vats are pleasingly imposing. They take up a decent footprint with the gothic leggies and they’re wide enough that they could reasonably be used as cover (maybe not more than once), so that ticked my boxes for playability.
The inhabitants themselves were fun and quick to build, and the modular design means I can always add extras down the line if I need something scenario specific. A quick paint job and they’d be ready to go!
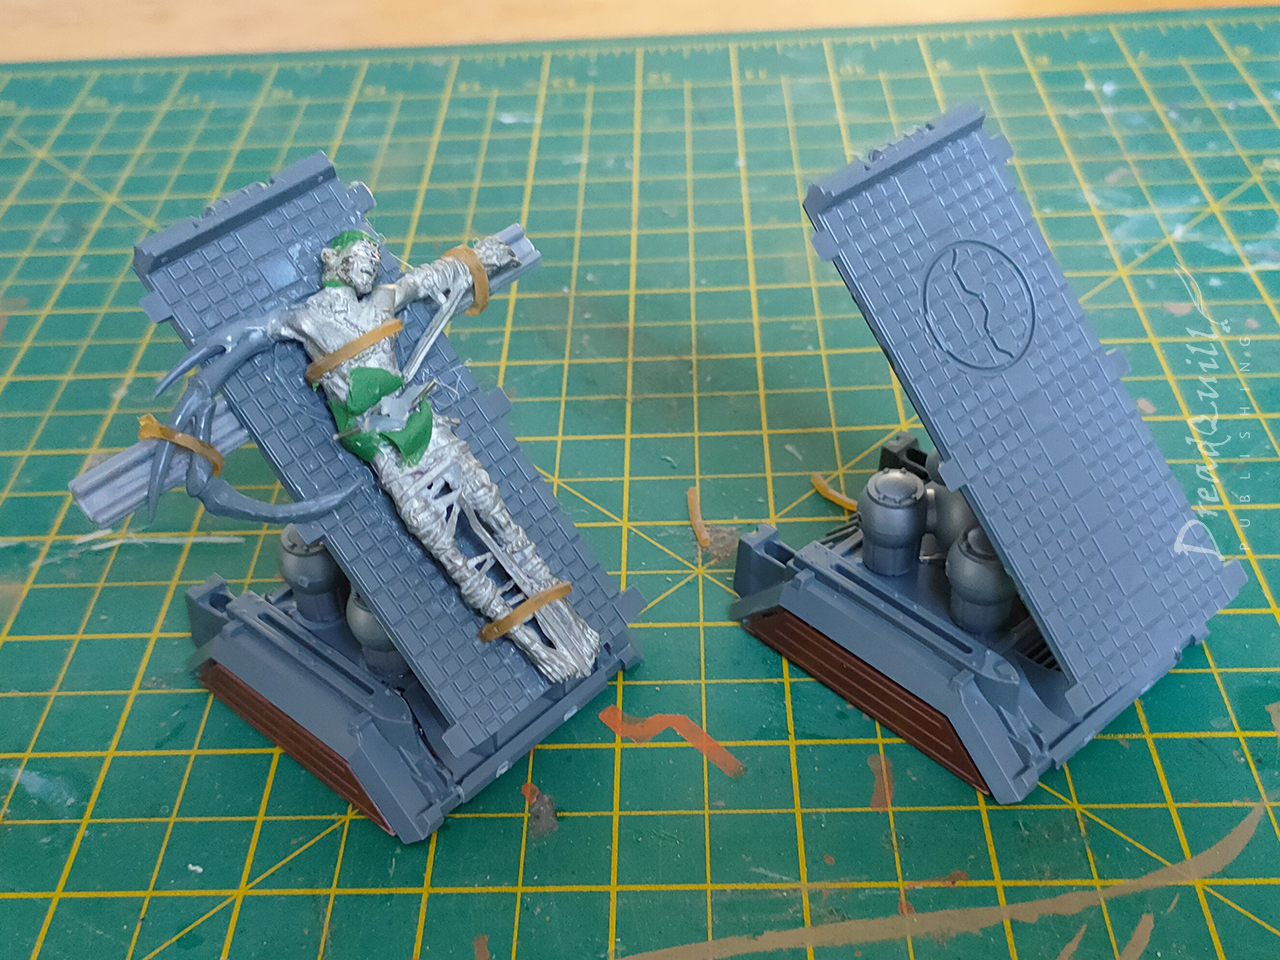
Autopsy tables
This idea was borne of the knackered Cherubael I had in my bits box, missing enough parts to render it unusuable as a miniature without a tedious amount of work. When flattened out though, it looked like a poor soul strapped to something with its abdomen opened up.
Cue strapping it to something!
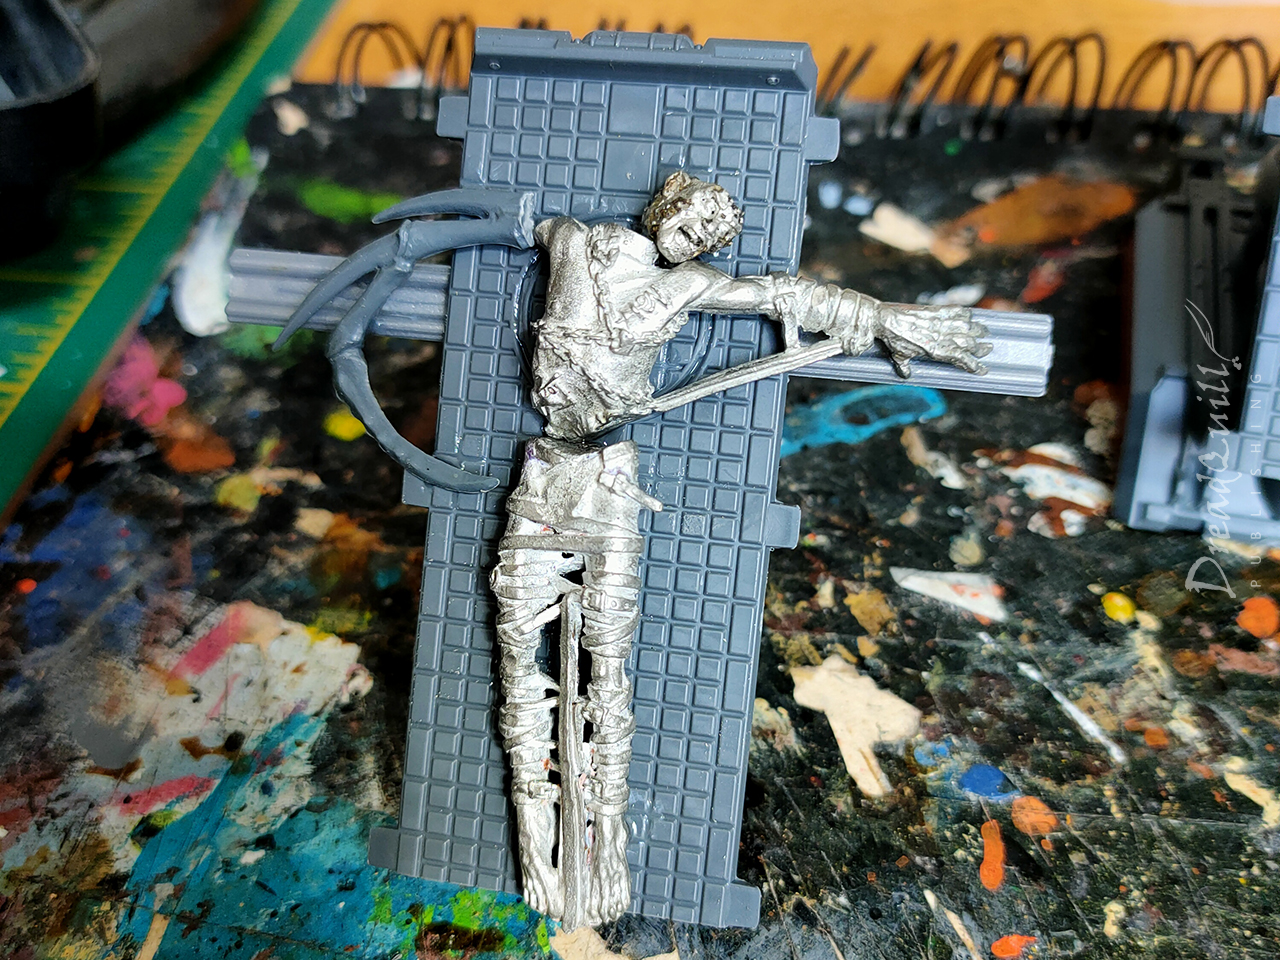
I had plenty of munitorum container parts left over from my freight wagons, and the roof/floor made a perfect back board to hold the guy up. I added some extra plastic widgets to secure the arms to, a weird bug arm (probably from the classic chaos spawn sprue) to build some visual narrative as to why this lad has been chopped open, and gave him Sergeant Stone’s shouting head that had the top removed. I think I envisioned modelling some kind of brain, but I just didn’t have time in the end. Just ship it!
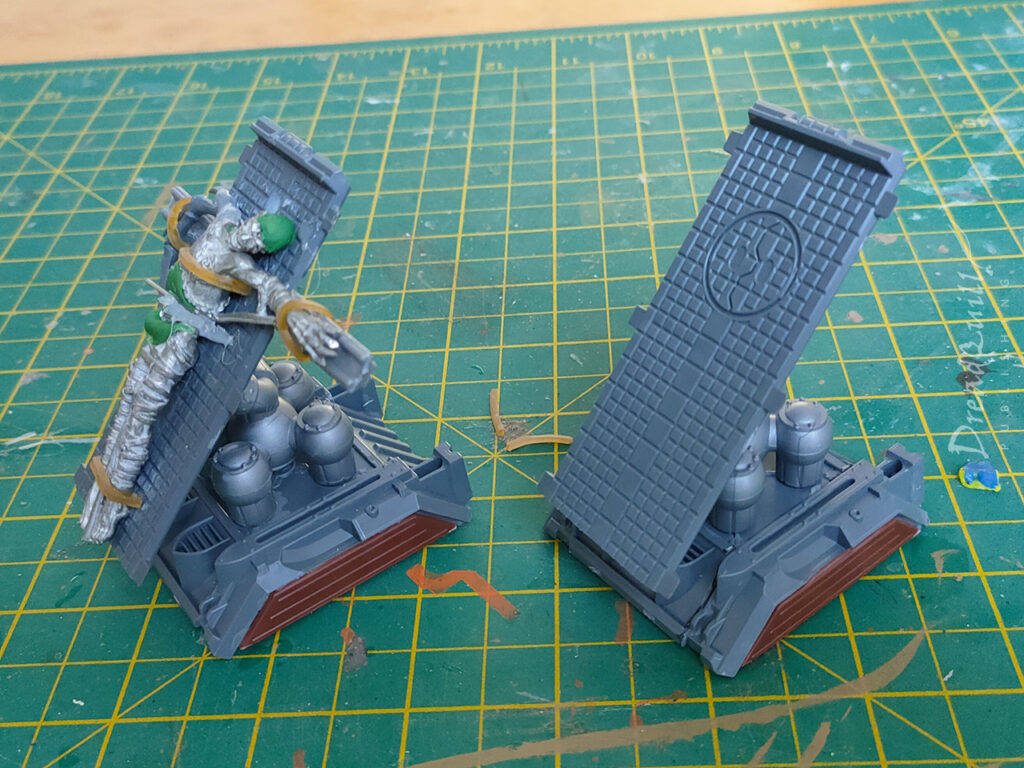
I used an old rubber band to tie him to the table, and created some skkin flaps out of green stuff for the belly. I filled the cavity with globs of hot glue to create some organ-like shapes and added some spiky bits of metal to look like tools.
The whole thing was mounted on a raised base made from a side panel of munitorum container. It came out so well I made a second one, but this time without the test subject. More props are always better, and gives you more narrative options for creating scenarios down the line. What’s scarier than finding a body on the autopsy slab? Not finding a body on the autopsy slab…
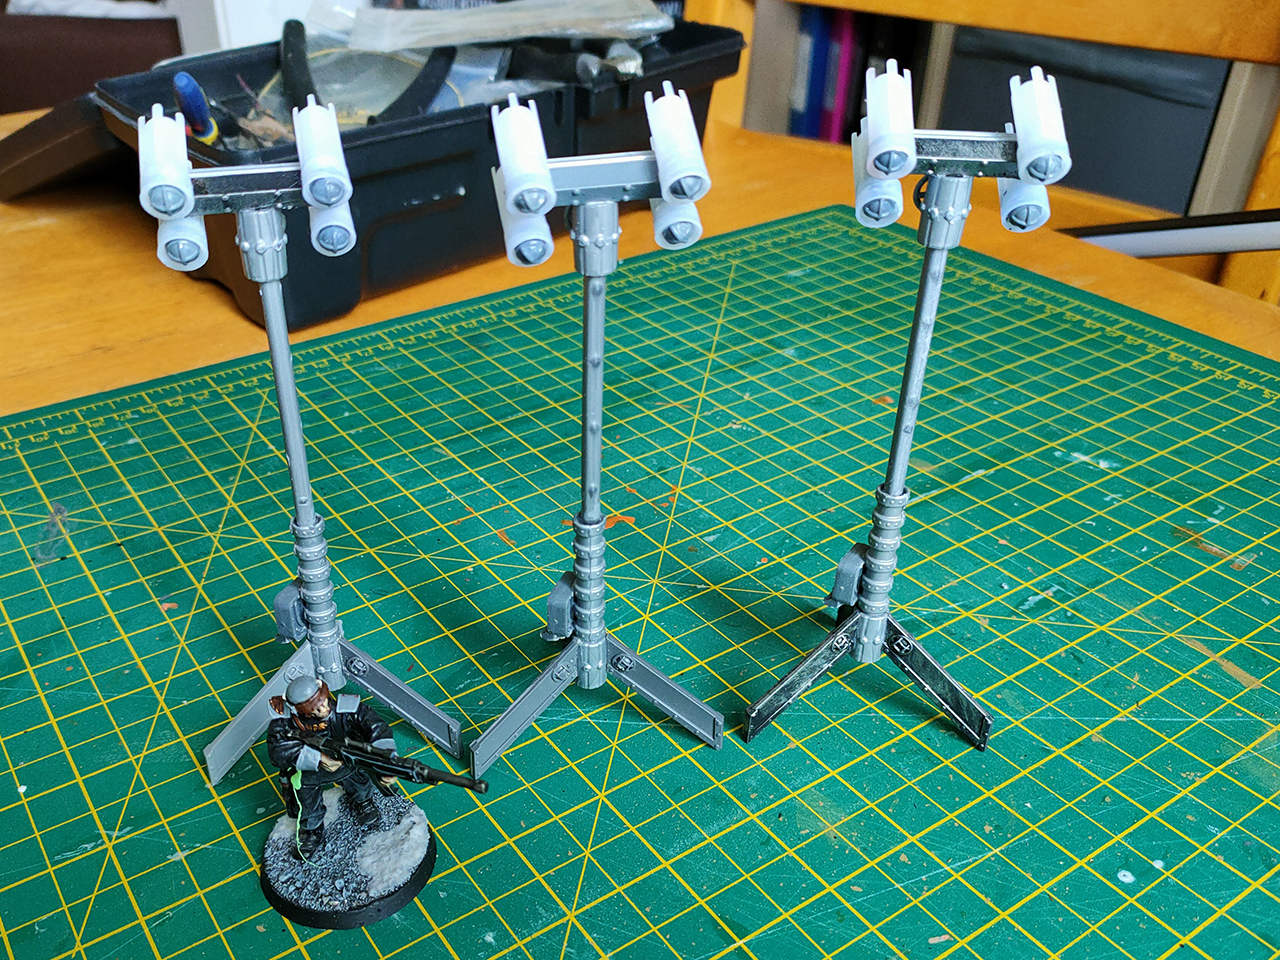
Floodlights
These were delightfully simple to put together, but a pain in the ass to visualise. Of course such things must exist in the 41st millennium, but what do they look like? You can use modern designs as a base, but you have to trial and error lots of different pieces to give it that suitably over-engineered riveted skull-punk look that 40k goes for.
For the lights I used old superglue lids with chopped down bulbs from the Sector Imperialis kit (RIP, gone before your time). Chunks of sprue and ribbed pipe from the classic Tehnolog Chemical Plant set helped sell the idea they were retractible.
The legs were made from cut down buttresses from the classic Cities of Death terrain (RIP gone before your time), with a little control panel from the Necromunda accessories sprue.
On with the paint!
More art than science
Everything was undercoated in black, then a zenithal of grey. I removed the transparent plastic tube during painting, as I was unsure what to do with it but I knew I didn’t want it to get messy.
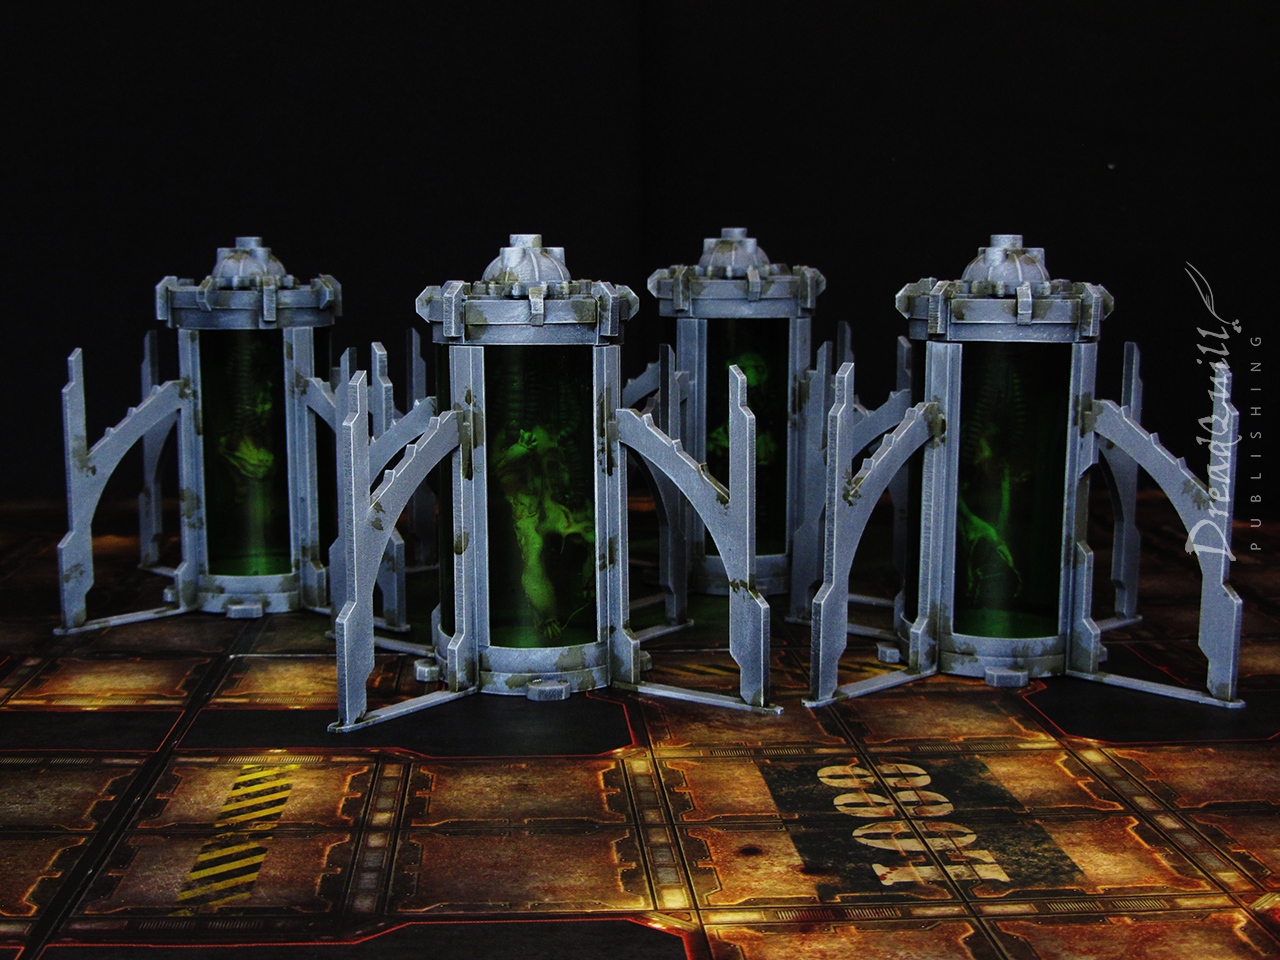
All the grey areas had Athonian Camoshade sponged onto them in random places to look like dirt and grime. When that had dried, everything got a drybrush with Deepkin Flesh to carry through the green tones.
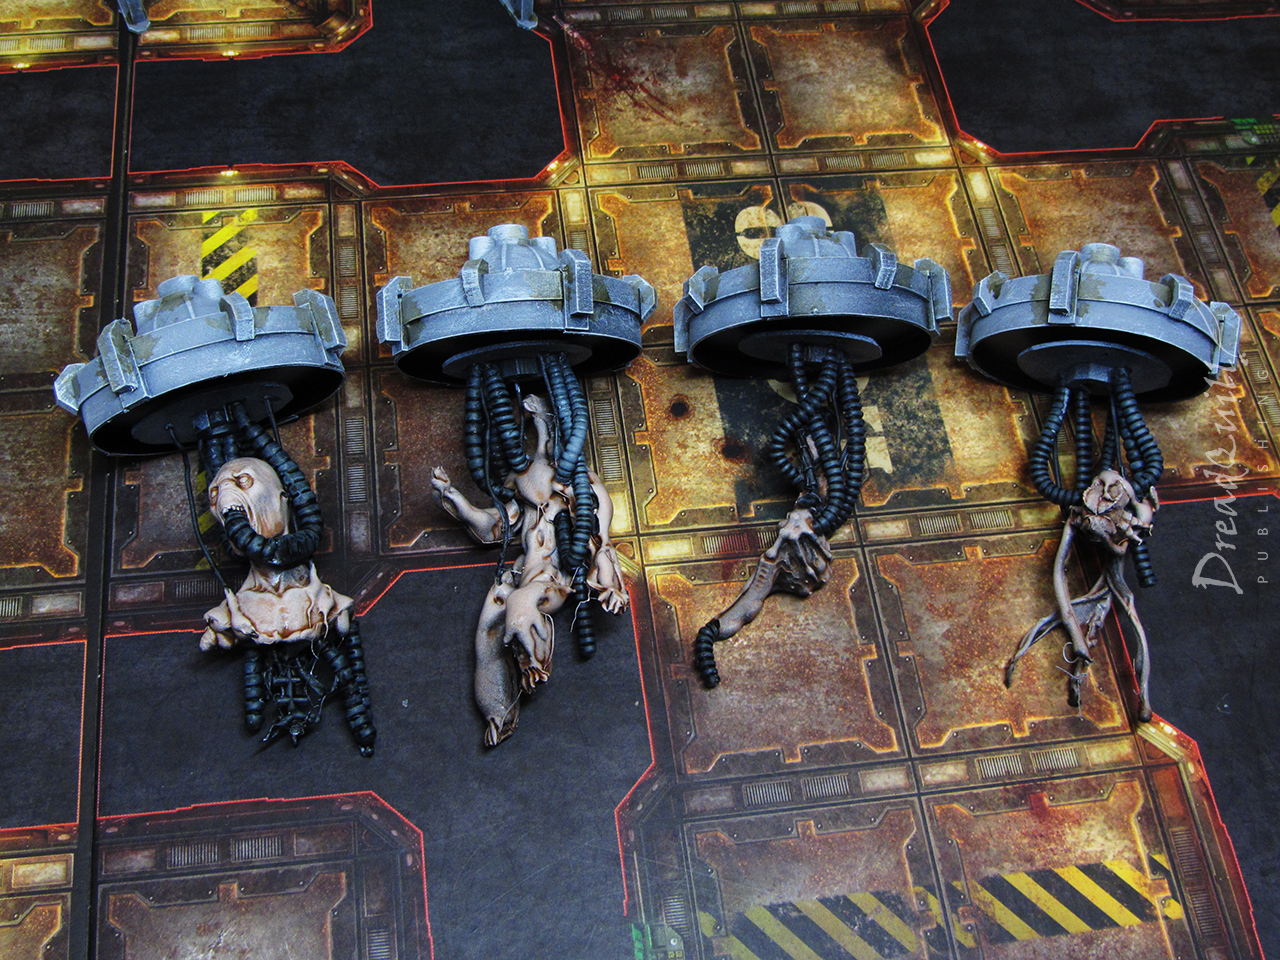
The beasties inside hit with Reikland Fleshshade on the fleshy parts and Templar Black Contrast on the tubes – that was it! No need to be fancy, as they would be largely obscured by the glass anyway.
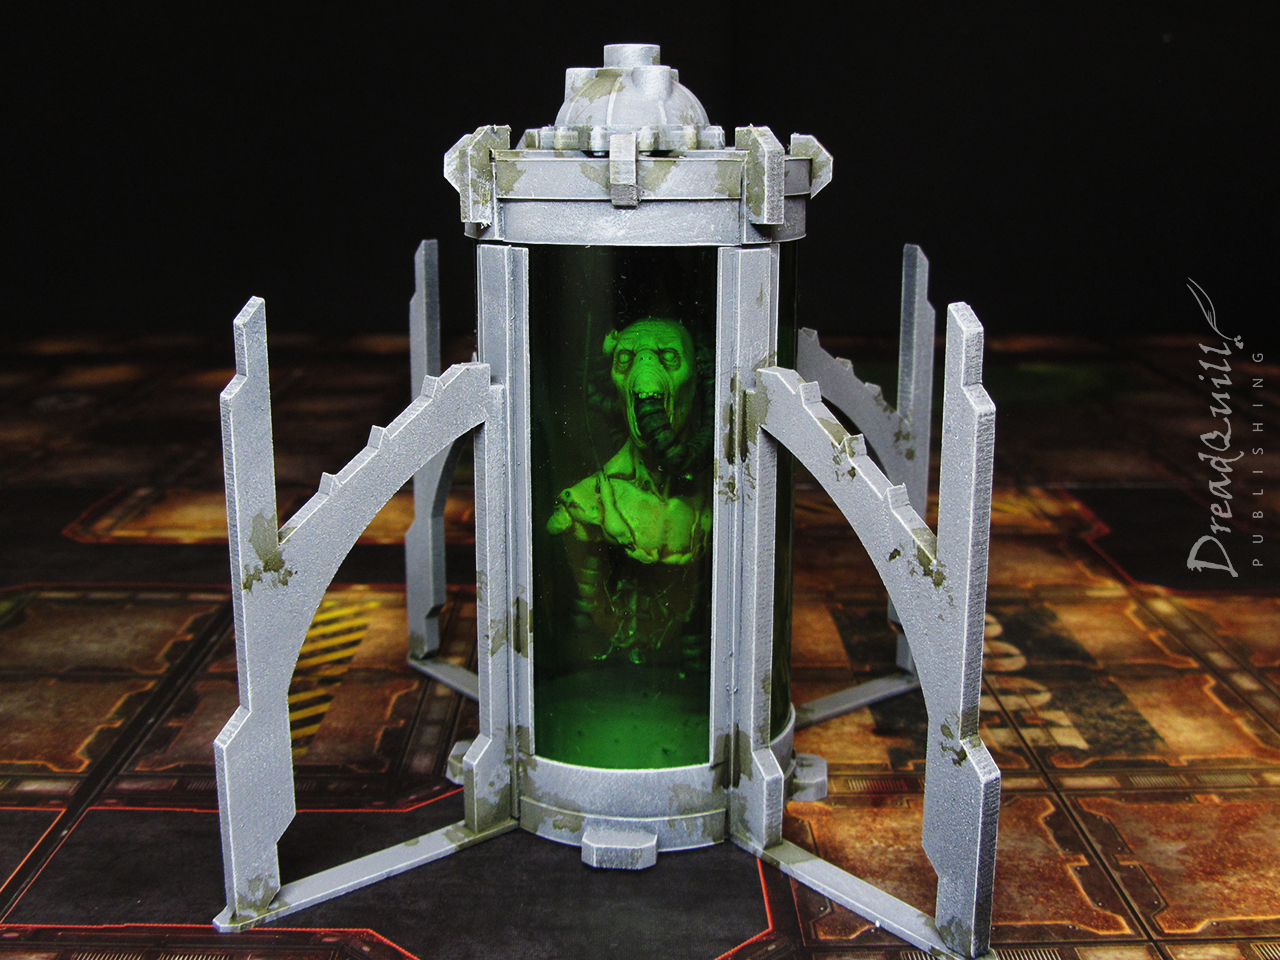
The glass itself was pleasingly straightforward. I have a pot of Tamiya Clear Green, which produces this incredibly toxic smell when opened, and produces an incredibly toxic effect when applied to miniatures. I used it to good effect on my Ambulls, and it always gets rolled out whenever I need some horrible goo effect.
In this case, I just slapped it on the inside of the tube and left it to dry, not worrying too much about it being patchy or uneven – it only adds to the effect!
The tables were painted much the same way – the only difference is the addition of everyone’s favourite Blood for the Blood God in key areas, and smeared a bit for visual effect.
The test subject was again just washed with Reikland Fleshshade on the fleshy bits and Agrax Earthshade on the straps. The chains were drybrushed silver and washed with Agrax again.
The floodlights I went a little wild with, adding two(!) extra colours to the palette.
The metal sections were painted Scorpion Brass and washed with Agrax, then silver was stippled over the top to look like chipped paint.
The lights were my first attempt at drybrushed OSL, and they’re effective enough to sell the idea that they are floodlights. I’d do them slightly differently now, having more depth of colour rather than flat yellow, and adding pure white to the centre of the bulbs where the light it coming from.
Overall, I love how well everything came out! I was sceptical through the process, especially of how the cloning vats would come out. I should have trusted the process – Tamiya Clear Green never lets me down!
My mind is fizzing with extra props I’d love to add to this collection, but I’ve closed the book on them for now. There’s enough to fill a board and the project is complete. Plus they look great in action!

If you’ve enjoyed this (or any other) posts, please consider helping me out towards hosting fees on Ko-Fi. Thank you!