MOTB: Inquisitor-scale STC habs

Finished product first!

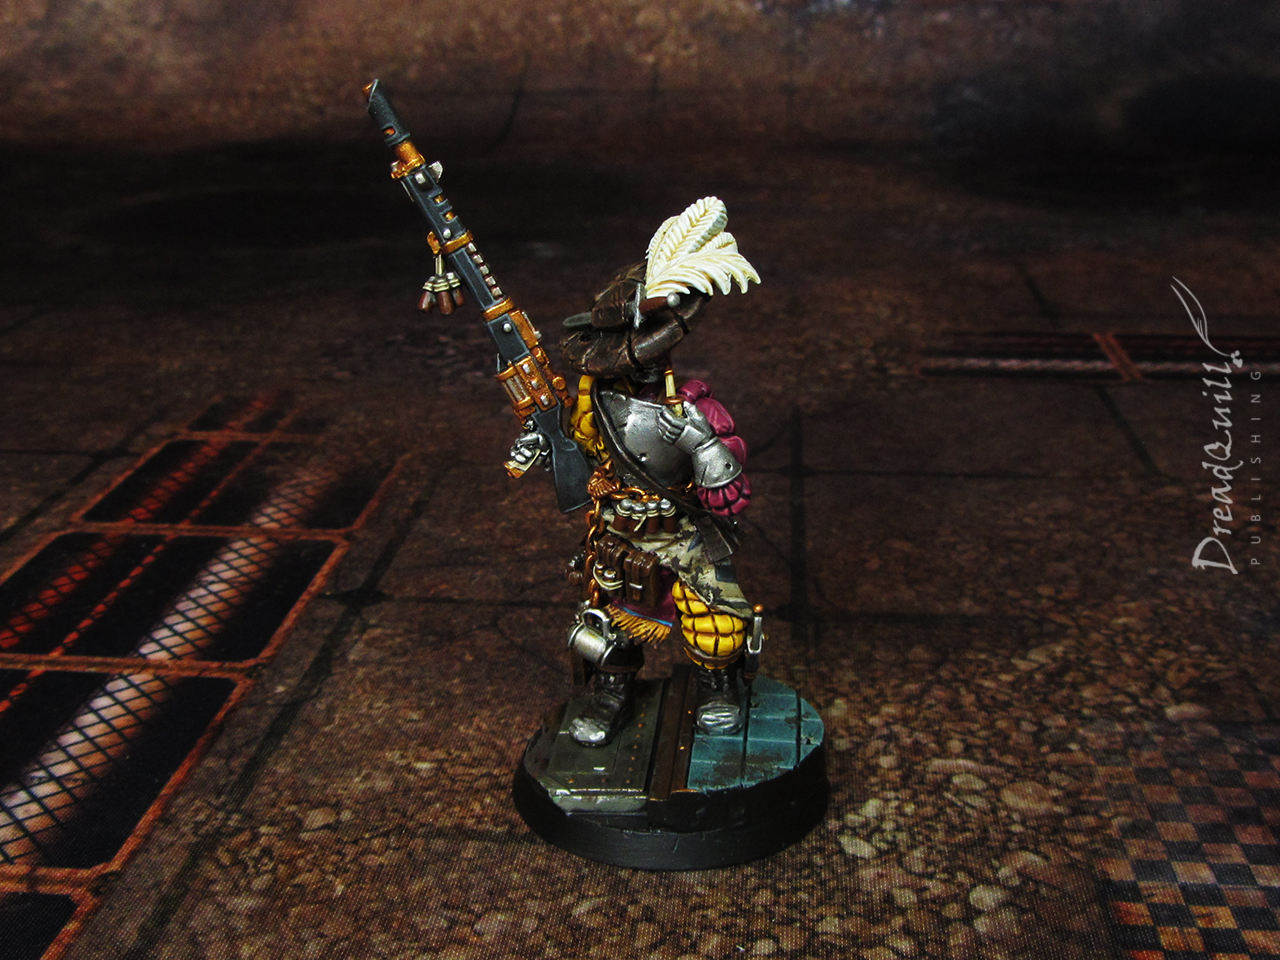
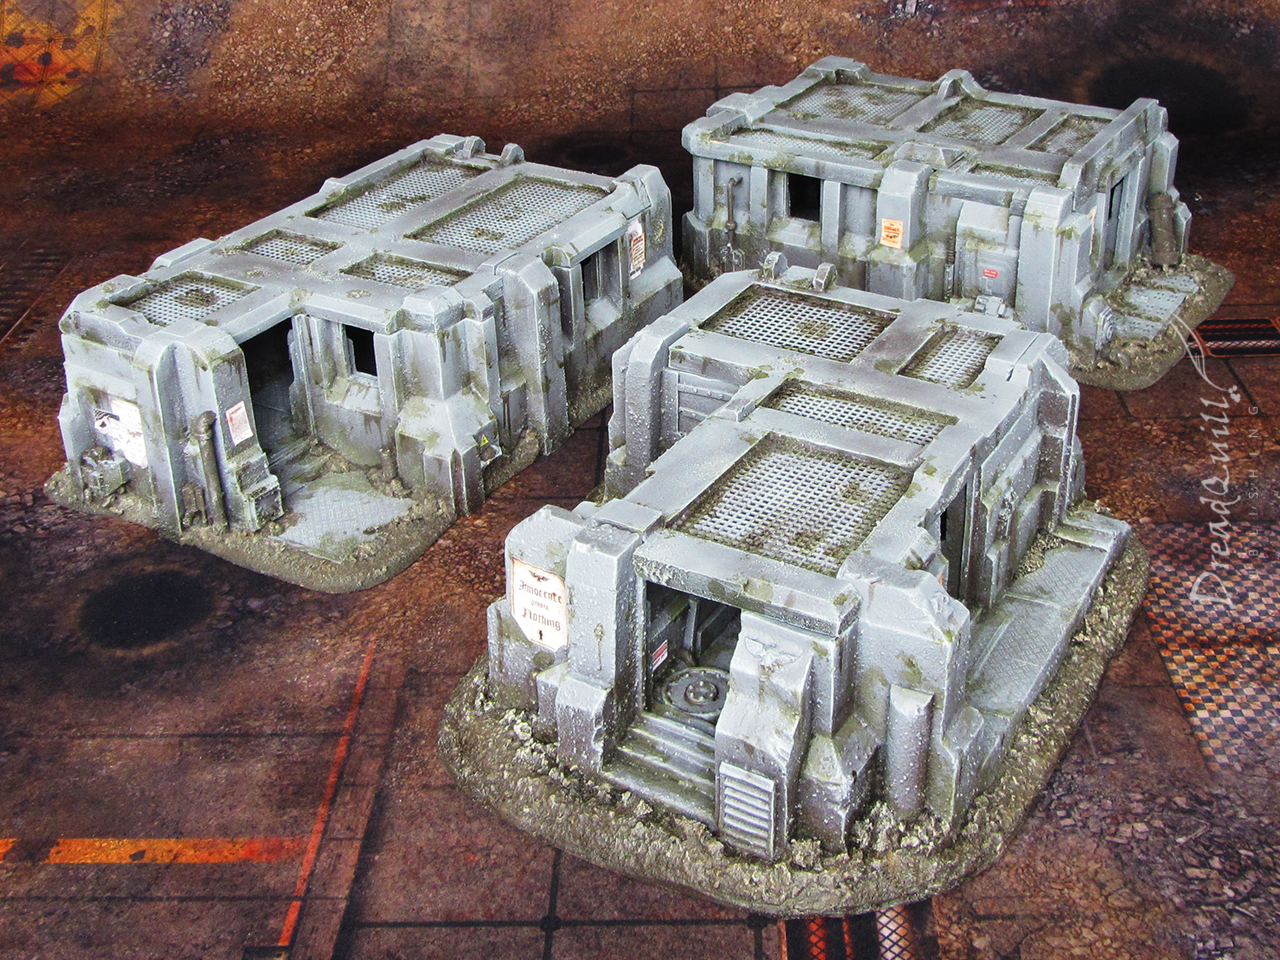
I’ve been on an Inquisitor kick recently, working on finishing some bits for an upcoming campaign with some chums. I’ve been finishing ancient WIP projects like Archmagos Quinne or Von Koppola, as well as building new pieces to furnish future battlegrounds.

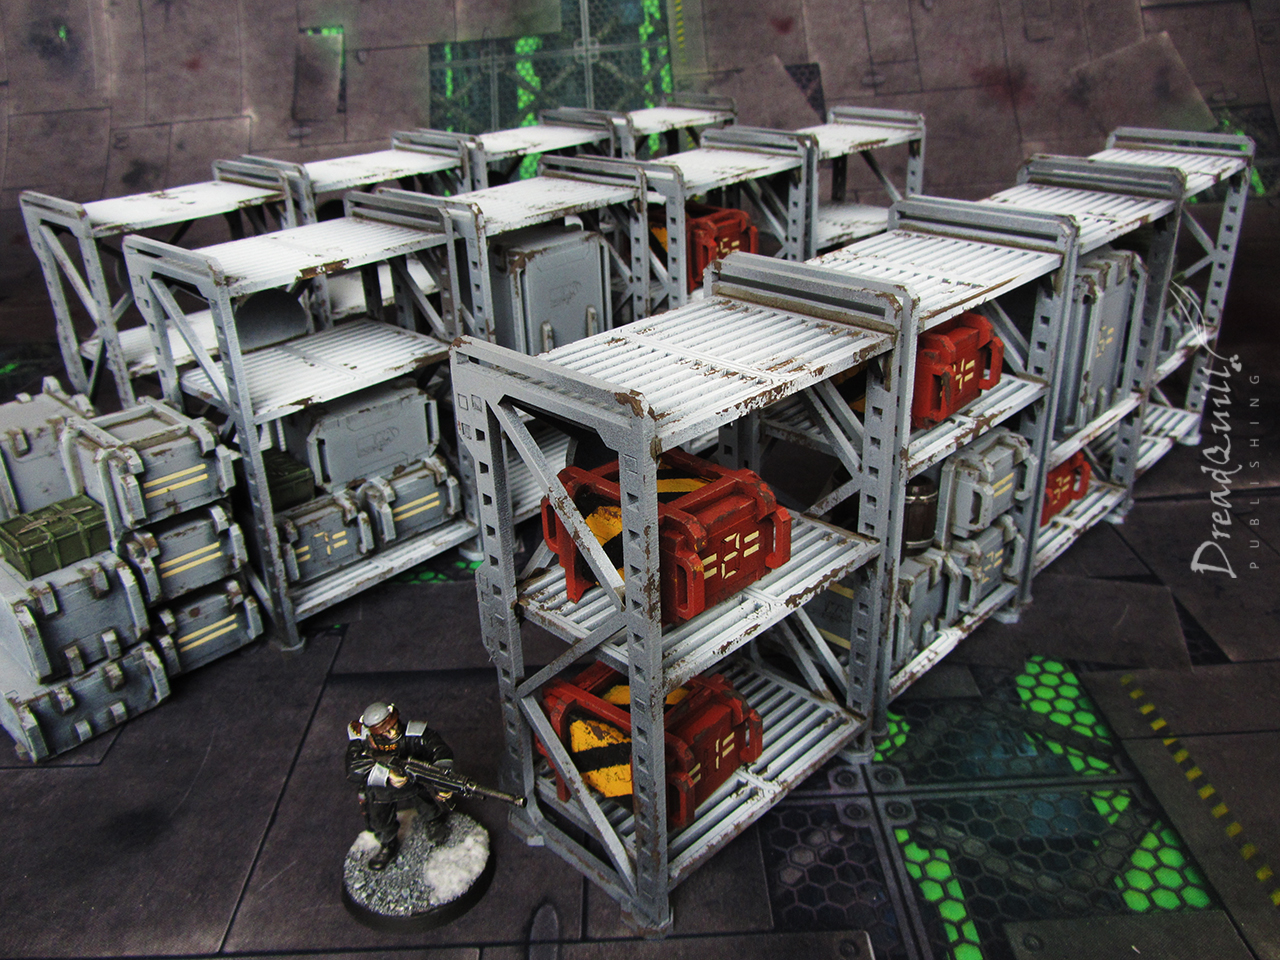
This time I turned my hand to something different – building something new out of something old.

Standard Template Construct

Very few “official” pieces of Inquisitor scenery exist from the early noughties – just a handful of (absurdly priced) gothic resin scatter from Forgeworld and the iconic STC Hab, a single piece cast from hard foam.

It had seen hundreds of hours of tabletop use, usually representing settlements or frontiers, but its loneliness never sat right with me. I toyed with the idea of buying several more pieces off ebay to create a small town, but it was prohibitively expensive and I’d end up having to hack them apart to make them look different, which felt like sacrelige. What if I made my own?

With some bevelled MDF bases from ebay and some chunks of balsa wood to make the base, I had my foundations laid. My primary material would be foamboard – a material I’d never used before – as I’d pinched a load of off-cuts from work. It also was a landmark moment for me as it necessitated the purchase of a cutting mat.

For the first time in almost 20 years, I finally acquired a different hobby surface than my old high school sketch book.

A sticky(back) situation

The foamboard was 5mm thick, making it easy to roughly work out how many sheets I’d need to make walls different thicknesses. What wasn’t easy was realising I’d assembled a bunch of walls using sticky-back foam board without peeling the protective paper off. I had to pull it apart and start again.

I had two goals. Firstly to replicate the look and feel of the original design, and secondly to make a large playable space inside the buildings. As much as I love the original piece, you can barely fit three miniatures in there, not to mention plot maguffins. The new ones would need to have nice wide interiors.

Buttress on both sides of the bread

On the subject of the original design, the more I studied it, the more I realised there was none. It was a scenery designer cutting cool shapes out of I presume pink foam and gluing them together in a cohesive piece.

There are no rules or repeat patterns, very few standard shapes, and very little logic apparent in its construction. It is very warhammer in that respect, but that makes it very frustrating to copy.

I picked out a few designs I liked and replicated them around the buildings. Buttresses came in two widths – thick (20mm) and thin (15mm), and would vary evenly in height. Some touched the top of the wall, some exceeded it.

By this point I had got exceptionally good at hand-bevelling, as any sloped edges are at a constant 0.5mm depth.

Some corners were gien buttresses, some were left bare, and some were given 45 degree slabs to round them off a bit. I tried not to have any repeating patterns – the original doesn’t have a single corner the same as another.

The only exception is perhaps the larger square building with its uniform front. I wanted it to be more like an operational or commercial building (I had code named it ‘town hall’ in m head) so needed a slightly more impressive entrance.

I had thought about taking measurements to turn into a 3D model or used as a template for other people to follow, but honestly it would be almost as much work again. Every section had to be painfully measured, cut, re-cut, shaved down, wiggled round etc just to fit. If someone wants to pay me to produce a template though, I’m all ears!

Filler? I hardly knew ‘er

Foamboard is a great construction material – cheap, lightweight, holds its shape perfectly, but isn’t without its downsides. It has exposed polystyrene edges, which will melt if you apply superglue/poly cement or hit it with a spray can. Also, no matter how careful you are, several bits of foamboard stacked up will never have a flat edge – they’ll always appear like three little sandwhiches. I needed to fill the sides.

Enter the all-purpose filler, increasingly becoming one of my favourite hobby materials alongside PVA glue.

After adding a few strips of thick plasticard around the windows and doors help define them a bit, all the exposed edges got a thick covering of filler, applied generously with an old Tesco clubcard, and kept very wet throughout to help shape it.

I wasn’t worried about the look at this point, only for coverage. Once it dried I hit it with the sandpaper to define some of those corners and smooth the edges. The biggest downside to filler is that it’s porous and incredibly powedery when it dries, making it not ideal for regular tabletop use.

Luckily its porous nature makes it perfect for my other favourite building material – PVA glue (aka white glue, school glue, etc). Give it a very generous coating over the filler it sucks up the glue like a sponge and dries rock hard. I was shocked how well it worked even after one coat, I was expecting to have to do several to see any benefit at all.

On with the detailing!

Raising the roof

I raided my bits box for various plastic gubbins to break up the flat shapes of the walls. Many of the original greebling is lost to time, although I could definitely ID a few bits here and there, including parts from ancient space marine tanks and some classic warhammer Orc shield designs. The chances of me getting those were slim, so I improvised.

Random bits were applied all over, with vague and indistinct shapes to suggest function without particularly describing it. I tried to follow the original’s intent, even if I couldn’t copy the design.

Once all the plastic had gone on (and I’d figured out where my ladders were going), I started to shape the roofs.

This was about as unscientific as you could imagine. I roughly measured where certain buttresses would be that I’d have to cut out allowances for, but due to all the extra filler and creative placement of features, it ended up being far easier just turning the whole thing upside down and tracing the shape onto the foamboard, with extra fine-tuning to make it fit.

Ultimate heresy

I dared to believe I could improve upon the wisdom of the ancients. Once I’d figured out my roofing system, I applied that to the original STC hab and was a) surprised at how well it worked and b) felt a strange string of emotions as I changed the shape and silhuoette of something that has been in my life for almost 20 years.

And yet in all those years, I never once imagined what the roof would look like. This felt right.

The other roofs were similarly patterned. A second round of foamboard on top vaguely followed the flow of the walls and buttresses. This created natural empty spaces that I filled with plastic embroidery sheeting, or ‘granny mat’, a super-cheap material that works wonders as industrial flooring.

The roofs were given the same treatment of filler > sanding > PVA to smooth down the edges, and by the time that was complete they fit very snugly onto their relevant bottom halfs.

Some details I made sure to add was the long ammunition cylinder from the OG crates and tank traps sprue (still in production today!), as the original had a few of those crates stacked up at the far end, and I picked out a Warhammer Orc shield design to add to one of the buttresses like a weird gargoyle. Both buildings got ladders on them too, much like the original had.

The interior of the habs was covered in plasticard in an embossed treadplate design, and broken up with strips of flat plasticard to emulate the floor of the original hab.

Final details done, it was time to get messy.

True Grit

Everything got a healthy dollop of my homemade recipe for textured paint. Equal parts PVA glue, filler, modelling sand, and poster paint for colour. The colour isn’t particularly important but it is necessary – the darker, the better. As this mixture is getting poked into the deepest recesses of the model, it’s better to have it a similar colour to how you intend to have the whole model undercoated.

Spray paint inevitably misses some bits or fails to get into troublesome nooks, so having a dark neutral colour in the gaps as part of your pre-undercoating process helps cover up a whole heap of sins down the line.

Let us spray

Everything was given a couple of healthy coats of matt black undercoat, with a health checkup halfway through to ensure the paint wasn’t eating through the foamboard.

Satisfied my PVA trick was working, I gave them a coat of TTCombat’s laser cut brown spray. As a side note, as much as I like having access to affordable coloured sprays, they do have an annoyingly glossy finish.

A final zenithal coat of grey spray paint was applied, leaving plenty of brown in the cracks and crevices.

Changing rooms

Painting these big boys was a matter of drybrushing and washing. I didn’t want to do any detail work as I didn’t want to distract from the big vague shapes (and I’d spent enough time bevelling foamboard, I just wanted to get them done).

  1. The habs were given a drybrush of light grey to pick out the textures and edges
  2. Athonian Camoshade and Agrax Earthshade were sponged on, largely in corners were rot might gather, but also applied as drips of muck.
  3. The dirt was given a coat of brown paint, then lightly drybrushed. Agrax went over the top, with another even lighter drybrush to pick out the larger rocks.
  4. For metal parts, these were given a flat coat of Typhus Corrosion with a light drybrush of metal picking out key details
  5. The finishing touch was adding some posters I found on the internet (and some I’d made mself), printing them out and roughing them up a bit before attaching them with PVA.

They were simple to paint, with just a handful of colours applied in interesting ways. There’s not much else to add about that part, so on with the show!

The S-shaped one
The Town Hall one

I’m overjoyed with how well they came out. The only thing I’d change is perhaps go a little lighter on the weathering so they’re not so green, but otherwise I’m really happy with them!

I wasn’t sure it would be possible to create convincing replicas of an ancient kit with no instructions or design logic, but it was! I’m thrilled to bits with how they came out, and I can’t wait to put them on a tabletop and live out my sci-fi spaghetti western dreams.

Let’s just not talk about why they don’t have any doors, eh?

MOTB: “Face-off” Von Koppola

Finished product first!

2022 is the year of Inquisitor. It divides perfectly by 54 (don’t look that up, just trust me) and I’ve got a big summer campaign planned that can’t possibly be stopped by another pandemic.

In anticipation I’ve been tidying up some long-standing WIP projects and building some 54mm scenery, like last week’s warehouse racking. The first to get photographed was this fancy lad, Nikolai ‘Face-Off’ Von Koppola, leader of the Koppola Independents and personal bodyguard to House Dacien.

Two by two, hands of blue(tack)

I’d hazard a guess and say this project is upwards of 10 years old – at least pre-2017 – as we were still playing the 1995 version of Necromunda. I went through a phase of recreating my favourite Necromunda figures in 54mm, and one of the gangs I made was a kitbash of plastic Cadians and Empire pistoliers. (Yes, I was doing Ventrillian Nobles before it was cool, get off my back)

I had a tatty pair of Slick Devlan legs from an ebay job lot a million years ago and started sculpting on some poofy trouser sleeves. I had picked out a rifle from a collection of resin printed 54mm weapons I picked up a million years ago and decided he would have the classic Imperial Guard skull head concelead beneath a big floppy hat. His arms were vaguely bluetacked into place with a clear intention to finish him off sooner rather than later.

Then I left the project in a box for half a decade.

I’m determined to cut down or finish up old projects, so this chap would be a perfect addition to the upcoming campaign.

Lots of layers and lots of patience helped me finish this guy off. I would spend 30-60 minutes every few knights tinkering with a new pouch or arm sleeve, building up the layers of detail into a miniature that told an interesting story when you looked at it.

I like big hats and I cannot lie

I had also fallen headlong down the Warhammer Fantasy hole. I’d been a fan of the Total War: Warhammer series for a while and played a decent lick of Vermintide, but I’d dipped my toes in the Warhammer Fantasy Roleplay waters and completely and hopelessly fallen in. I had to work that into my 54mm pieces somehow, and this miniature seemed like an excellent way to exorcise these particular creative daemons.

Empire Militia by Karl Kopinski

Classic Warhammer Empire artwork, particularly by Karl Kopinski, often had them bristling with knives and trinkets and gubbins. This is quite tricky to do at 28mm, but at 54mm you get extra space to build in lots of little touches, and the sword-through-the-hat is an excellent motif I wanted to replicate in my own work.

I wish I could say there’s a neat trick or life hack for working with green stuff like this. Internet users hate him with this one neat trick: do everything really slowly and in really small batches so you don’t put your stupid fat fingers on stuff that’s already curing and ruin an evening’s work.

Big feathers are also an important part of the aesthetic. As I was assembling this half-robot man with flamboyant clothes, I was trying to figure out what kind of character he would be. He’s certainly not a sniper – he’d be spotted a mile off. He’s also missing a few chunks of his original body so he’s clearly been on the losing side of a scrap on a few occasions.

I figured him as a kind of duellist or a warrior from a Napoleonic gun-line – the kind where you stare your opponent straight in the eyes and never let them see you bleed. In no way inspired by a film that was on at the time of sculpting, “Face-off” was born.

Trooping the colours

I had already determined the colour scheme from a previous set of miniatures I had done for classic Necromunda, and then reappeared briefly as some Rogue Trader baddies. A quartered yellow/purple fabric pattern, with lots of flamboyant silvers and golds.

The golds were washed with Reikland Fleshshade to give them a vibrant orange hue which I was quite pleased with. I’m always conscious about mixing gold and silver in a colour scheme because it can look really tacky, but I think it works here as it’s very much the vibe I’m going for.

There’s a part of the Inquisitor Rulebook in the painting and modelling section where the colour schemes of the stock models are discussed. One part that always stuck in my head as an impressionable youth was Slick Devlan’s painter discussing their choice of paint for his gun handle.

It’s such a throwaway part of the miniature, but they talk about painting the handle of one of his pistols in a white ivory because he’s the kind of guy who customises and looks after his guns, even if his clothes are all tatty and horrible. I try to work that kind of sentiment into the colours I use, even if it’s small and insignificant.

(Naturally this means that all my gun-nut characters tend to have ivory grips on their weapons, but shh.)

One of the vestiges of the miniature’s previous life as an ebay job lot was a strange tattered piece of cloth wrapped around his waist. I originally attempted to remove it but realised it was covering up a horrifying remodelling job underneath and I didn’t fancy making more work for myself.

So the question became, why does this wealthy well-kept fighter keep a raggedy piece of clothing wrapped around him? I reasoned it would be of sentimental value to him, and perhaps impossible/impractival to repair, so I painted it up as an old regimental banner he would have fought under. Perhaps it was his proudest moment, or a crushing defeat he very nearly didn’t walk away from, and keeps it with him as a reminder.

As for weaponry, I decided this weapon would be a kind of long las with lots of single-fire hotshot packs. The image of him tearing off las rounds dangling from his belt and lining up a shot under fire was too good to pass up, so I gave him Quickload and a high Nerve characteristic to compliment that.

Usually I try to avoid handing out True Grit except to very special cases or it loses its sheen, but I figured this guy absolute warrants it. He’s not particularly hard to put down, but it’s incredibly difficult to make him stay down. Perhaps he’s the kind of ‘sporting’ fighter that lets his quarry take the first shot…

I’m very, very happy with how he came out. Not only has it been great to blow the dust off my sculpting muscles again, but completing a project I started almost a decade ago feels excellent.

I always feel I’m being harsh on myself for wanting to cut corners on larger scale minis, something I actively encourage myself to do on groups of smaller minis, but I think taking the time and seeing it through has paid off.

Fingers crossed I can get the next one done in under 5 years!

MOTB: Crates and racking

Finished product first!

A while ago I bought some wood in a Kickstarter and thought nothing of it. I had no idea what it would awaken in me.

Fast forward many moons and I have returned several times to MAD Gaming for their excellent modular wares. As part of one of those orders I picked up their rather excellent Warehouse Alfa 5 kit, which was ostensibly just a lot of shelves and boxes. Little did I realise just how many shelves and boxes I would get.

Wood you kindly

I’d been doing some terrain auditing during the Plague Years, and realised I didn’t have anything to represent interiors. The last Inquisitor game I played before The Long March of 2020 involved a warehouse raid, and I didn’t have anything particularly decent to bring that wonderful skirmish battlefield trope to life.

I was surprised at two things. Firstly, how little warehouse terrain is commercially available. You get the odd resin piece from Mantic or TTCombat, but trying to actually fill a warehouse with that stuff would be madness.

Secondly, how huge the MAD Gaming warehouse kit turned out to be. Not just in physical presence on the tabletop, but how well it scaled up to 54mm.

You can buy all the parts individually, but you save a bit of dosh with the bundle and pretty much get the crates thrown in. You also get lots of adorable little palettes, which I was a little disheartened to see that they didn’t fit any of the crates that came with the kit, so I tucked them away in the bits box for later use.

Crate expectations

Bad news first: building those crates was a very unpleasant experience. They look great when they’re done, but they were so fiddly to assemble. It wasn’t obvious from the instructions whether I had the wrong number of edge/feet pieces, or I was supposed to freestyle it.

The stacking crates (red-coloured ones in later pictures) were the main offenders. You build the six sides of the box, then you have to force the collars over each end, then secure them with the bars on top.

These have been cut to such small tolerances that you have to exhert an uncomfortable amount of force to squeeze them on, often bursting them in the process. I ended up having to shave down corners and edges just to make them fit. If I was to build them again I’d simply cut the collars in half and glue them in place.

Nice rack

A neat little touch is having the freedom to have the racking shelves at any height, and they come with lots of little L-shaped widgets to help you do that. You don’t get much leverage on them to push them into the holes as they’re barely 3mm across.

I made it much easier on my poor thumb by shaving down the pegs a bit so they slid in easier.

You’ll also want a couple of rubber bands to hold them in place while it all dries. You don’t want a wonky rack now, do you?

Mindless shelf indulgence

The good news now: Once built, it takes paint brilliantly and is probably some of my favourite terrain I own. Everything was tabletop-ready in an afternoon of rattlecans in the sunshine, with details and weathering taking another few hours.

The racking was given two coats of matt black spray, followed by a zenithal highlight of grey spray. A delicate blast of white spray was applied straight down the middle to highlight the shelves. A poor man’s airbrush!

Weathering was easy – a rough uneven pin wash of Agrax Earthshade in the corners, and Typhus Corrosion applied with a piece of torn off sponge. Done!

Did I mention they were big?

Fat stacks

Another trick that helps me with modular scenery is gluing smaller bits together into larger modular chunks, such as stacking crates or barrels. I’ve had some bad experiences with things being too modular, as you spend so much time setting up and tearing down a game board. Play with larger building blocks, and break it up with smaller pieces.

This is one example of a larger building block – five crates from the MAD set glued together with a smaller 40k plastic crate on top for garnish.

These were painted in much the same way as the shelves, but with block colours painted in before the Typhus Corrosion stage. A light flesh colour was used for the numbers, and the crates were Castellan Green, Nuln wash, then drybrushed with Straken Green.

The red crates were blasted with red spray (the white zone is for loading and unloading only), with a fiddly lot of masking tape applied for the hazard stripes and sponging on the yellow. It turned out not to be worth the bother in the end, as I needed to do so much cleanup with a brush that I may as well have brushed it on in the first place.

Grouping them into stacks makes it easy to drop them into the tabletop to create interesting shapes of cover, or pile them together into a megastack without worrying about stability if models decide to go for a climb.

Show me your wares

I was also careful assemble the shelves at different heights to accomodate different stacks of crates. Being able to pop in a stack makes the shelf look busy and populated, without having to do any of the actual menial work of stacking a shelf!

They look great combined combined with the racking, and I’ve got tonnes of other scatter that would look great on these shelves too.

If you leave enough loose crates spare, you can also create a pleasing mess when players inevitably knock them over (accidentally or purposefully).

Despite being unreasonably fiddly to assemble, the finished products are also very durable and stack perfectly inside standard-sized boxes (A4, A3 etc). They can be stored without packing with bubblewrap too, so you can fit a big battlefield in a small container.

racking my head for more puns

Despite my frustrations with assembly, I would still unreservedly recommend this kit. For Necromunda and other RPG games, I can see these crates and shelves being used as scatter to add flavour. Just be sure to trim down some of the close-fitting parts to save yourself lots of finger pain.

For Inquisitor players however, I can’t recommend how much you need these things in your life. These should be a must-have for anyone’s 54mm collection. The scale is perfect – I’d argue more suitable to 54mm than the smaller 28-32mm counterparts. Warehouses and hangar bays are the inevitable battleground for any investigation, so do yourself a favour and get yourself the best rack money can buy.

MOTB: Pringles Crane

Finished product first!

I have a penchant for tubular snacks, whether it’s a tower of pringles or a silo of twiglets, there’s something about a big foil-lined cardboard cylinder I find difficult to let go.

Last year I acquired some Galvanic Servohaulers to add some flavourful scatter to my games, and in my idling over the Christmas break discovered that the circular rail the crane sits on is the perfect diameter of the bottom of a Pringles tube. Haha jk but what if…

Buttery biscuit base

The core structure of the project was naturally the Pringles tube, but it needed weight and stability. The bottle of Old Speckled Hen I was enjoying while musing over the project fit so snugly into the tube I didn’t bother trying anything else. I gave both a rinse out and sealed it in with hot glue.

I build a rough box out of old beer mats I had lying about and decorated with lots of lovely gothic MDF inserts from MAD Gaming. I designed it to fit the theme of my Mercy table, which I haven’t shown off yet other than some very early WIPs.

The crane itself was a joy to put together. The only real change I made was to add a kind of balcony so that models could stand at the top. The whole point of building tall towers is so people can climb it and get knocked off, right?

The crane largely stayed in place by friction, but being so unbalanced I didn’t want to chance it toppling off mid-game. I added a pair of magnets at the very centre (one is visible in the first picture) so the crane could still swivel.

After playing with magnets for my Mercy board, I’ve come to appreciate their applications in scenery. I’m still not fully sold on them for minis, perhaps for some larger ones where you want to swap the weapons out between games or remove wings for storage, but being able to fold down scenery for transport seems like a must.

It’s big! Even with a double Move, a Goliath ganger wouldn’t be able to reach the top. Some house rules might be necessary I think…

The finishing touch is to smear on a load of my home-made textured paint recipe. Equal parts PVA, cheap filler, sand and black poster paint. Great for filling gaps and adding texture to flat surfaces.

A crane canvas

This was possibly the largest single piece of scenery I’ve painted to date. Luckily I already had my painting recipe down to a T from painting all my hab blocks (I really should get those photographed soon eh).

  1. Blast everything with black spray paint. MDF often needs two passes, as it tends to absorb a lot of paint.
  2. Give it a zenithal highlight of brick red, I use Autotek Red Primer.
  3. A very light dusting of grey primer, again I use Autotek
  4. Main colours are blocked in – Averland Sunset was used for the yellow parts, Deepkin flesh for the wall sections around the base
  5. All the grubby areas were given a wash with Agrax Earthshade. It also gets splattered and dribbled down walls to look like grime.
  6. Watered-down orange paint was then applied to recesses and walls to look like rusty water damage. Just slap it on anywhere and let it dribble down.
  7. With a bit of torn-off sponge, light brown is dabbed on to exposed edges to emulate paint chipping, followed by a lighter application of dark brown
  8. Posters and decals are added, just tiny bits of paper printed off from a home PC, scrunched up and with some more paint dabbed over the top.

A time consuming process, but it looks wonderfully grubby when it’s done.

I’m very happy with how it turned out! It was relatively quick to paint for its size and does exactly what I wanted it to do on the board – be big and tall and playable.

I’m counting down the days for when someone topples off the balcony. You better believe it falls under the 10″+ category for fall damage…